
AfterCodecs is a native plugin for the whole Adobe CC Video suite, working on both MacOS and Windows. It brings fast and efficient codecs to After Effects’ Render queue and a new Format choice in Premiere Pro and Media Encoder’s Export window. It supports HAP codecs, in any resolution, with Snappy lossless compression and CPU chunks for multi-threaded decompression.
How to find AfterCodecs in Premiere Pro and Media Encoder
Download and install AfterCodecs (both trial and full version) with the installer provided here. It will install AfterCodecs for Premiere Pro, Media Encoder and After Effects.
Close any Adobe app running before launching the installer. Launch again Premiere Pro, select the sequence you would like to export and go to File > Export > Media in the top menu, this will open the Export window.
In Media Encoder, once you have a sequence queued for export, click on the button in the Format column to open your export settings.
From this point onwards, the process is exactly the same for both applications.
Select AfterCodecs in the Format drop-down menu then, under the
Video tab, select the MOV format (HAP codecs only support
.MOV and .AVI containers).
You can select your resolution now or after selecting your AfterCodecs settings. Unlike other HAP plugins, AfterCodecs has no resolution restrictions. This means you don’t have to worry about only being able to export resolutions that are multiples of 4, for example.
Click on Open AfterCodecs Settings:

Selecting your AfterCodecs settings
HAP Flavors
On the Video Codec drop-down, choose between HAP and HAP Q. HAP Q flavors have improved image quality, at the expense of larger file sizes. HAP flavors have the lowest data-rate and a reasonable image quality.
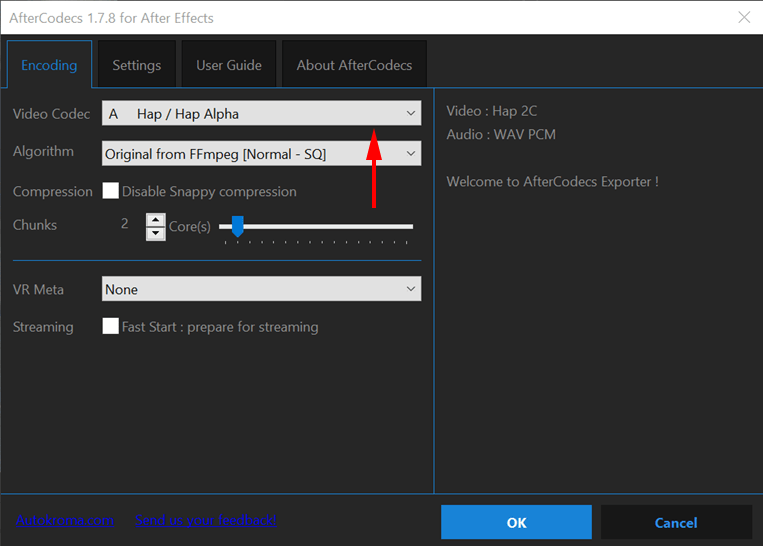
Depending on whether you want to export the Alpha channel or not, there are four different types of HAP codecs to choose from: HAP, HAP Alpha, HAP Q and HAP Q Alpha.
Note : VLC player does not currently support HAP Q Alpha.
These are usually treated as four separate codecs settings, but AfterCodecs simplifies it by only having two options: HAP and HAP Q, with the choice to include an Alpha channel for either of them.
If you would like to export HAP A or HAP Q A, select either option from the Video Codec drop-down and you will be able to confirm that you require an Alpha channel later, from the PrPro export settings menu (see end of this article).
HAP Algorithms
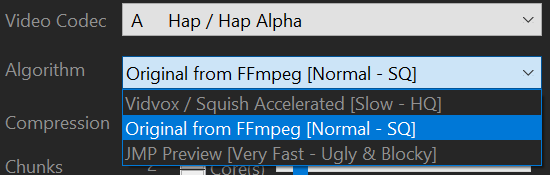
If you are exporting HAP or HAP Alpha (not HAP Q flavors), AfterCodecs also lets you select a different algorithm that suits your needs.
- Vidvox / Squish Accelerated: This an optimized algorithm created by Autokroma that encodes HAP the slowest but will deliver the highest quality available.
- Original FFmpeg: This is the original algorithm, it will render faster and deliver acceptable quality, but the Vidvox algorithm does look better.
- JMP Preview: As the name states, this will deliver low quality files quickly, so it should only be used for previews that are needed fast.
Snappy

Select the number of CPU cores you would like to use for multi-threaded decoding. 1-2 cores is recommended for HD.
You can select more cores for 4K+ content, but they should not exceed the number of CPU cores in the computer used for playback. Above the chunks slider, you have the option of disabling snappy compression. This is not recommended without testing, as it can result in choppy playback. Without snappy compression, multithreaded decoding is disabled, so you will be unable to select your desired number of cores from the “chunks” slider. Once everything is configured to your liking, click OK on the AfterCodecs setting menu.
Alpha Channel
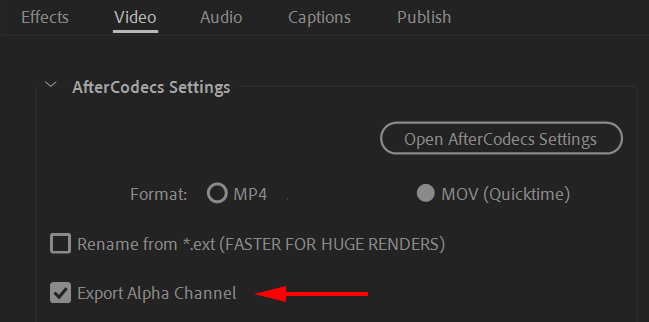
If you would like to include an Alpha channel in your export, simply tick the Export Alpha Channel box in the PPro/AME export settings, after configuring your AfterCodecs settings (this will only work if the codec you selected supports an Alpha channel). Ticking this Export Alpha Channel box will export HAP Alpha or HAP Q Alpha, depending on which one you have chosen in the Video Codec drop-down of the AfterCodecs menu.
- If you selected HAP / HAP Alpha from the menu and you tick the Export Alpha Box, it will export HAP Alpha, otherwise, HAP.
- If you selected HAP Q / HAP Q Alpha from the menu and you tick the Export Alpha Box, it will export HAP Q Alpha, otherwise, HAP Q.
Export!
Click Export in PrPro or the play button in AME and you’re done!
For more information on HAP codecs, please consult https://hap.video/.
Below is an overview of a few different AfterCodecs features you will also get for free when buying AfterCodecs. Don't forget, we have a 500 frames trial to test for free!
Download and install AfterCodecs (both trial and full version) from here!
AfterCodecs Bonus Features Overview
AfterCodecs offers a range of features specific to Premiere Pro and Media Encoder. They can all save you a lot of time and frustration simply by eliminating the extra steps required to achieve the same results in vanilla Premiere. Some of these even allow you to do things that are completely impossible in regular Premiere. Here are a few of them:
- MultiRender: When editing, it is often required to export multiple parts of a sequence in the same format. To do this in regular Premiere, you would have to export each clip individually, selecting your settings every time, or to create a new sequence with the clips and export it. Both of these methods are inconvenient at best, especially if it is a process you have to repeat often. AfterCodecs allows you to use markers to indicate which parts you would like to export, and the export settings only have to be selected once. This is a much simpler process and it can really save massive amounts of time.
- Multiple audio track export: The audio export settings in regular Premiere
Pro can be quite limited, especially when it comes to exporting multiple
tracks on one file, as it is only possible on a few formats. AfterCodecs lets
you export multiple tracks in mono, stereo or as a single multichannel track.
This feature supports every format provided by AfterCodecs. So, for example,
you can export an
H.264file with as many tracks as you would like, which is impossible in vanilla Premiere. - Quick Sub Resolutions: In today’s world of video production, 4k+ resolutions are becoming increasingly common. However, except for final delivery, it is quite rare to actually be exporting 4k. This simple feature allows you to quickly set your export resolution to half, quarter, or an eighth of your sequence resolution, instead of having to type it in manually. It might not seem like a lot, but, if you are exporting many previews, this can save you a lot of time.
- Custom Framerate: As well as higher resolutions, high framerate are becoming more common. Regular premiere only supports exports up to 60fps, only with certain preset framerate. AfterCodecs allows you to pick any framerate you want, whether it’s 74fps or 1000fps, in any format.