Using Proxy while editing in Premiere Pro could make your life better ! It could save you time and improve your playback performances. In this article, let's see what a Proxy is and how to use and work with this feature in Premiere Pro.
What is a "Proxy" ?
Some media need a lot of computer resources to be decoded. So you end up having choppy / stuttering playback while editing them : annoying !
You could think the bigger the footage is (disk space used), the more your playback is going to struggle, but it is not always true ! Some footages heavily compressed (not taking so much disk space) can take a lot of resources to be decoded. Is is especially true for "interframe" long GOP Codecs such as H264 / H265, because those files are compressed over time : one frame decoding can depend on other frame data, so it needs first to decode one (or multiple) other frame to decode the wanted one.
One solution for that is to use a Proxy. Your initial footage is rendered/exported to a new file with another codec (generally a "light" codec, to improve decoding time) and generally a lower resolution.
Another solution is to transcode your original Media into intermediate files. Once transcoded, your original media should not be used anymore, so quality is important here ! The difference with the proxies is that the transcodes are used for the final rendering (which can improve rendering time thanks to smart rendering !), but with proxies it is easy to access/view your original media and also edit with footages with lower resolution/quality.
You can find here a good topic on the Adobe Community Forum about proxies/transcodes and which codec to use for proxies.
Using Proxy for quick low quality exports
Using proxies can have another benefit : rendering time ! You could not need a high quality export sometimes. It can be for your clients for example, just to check that your editing fits their needs, or even for you.
In that case, you can choose to render using proxies in Premiere Pro/Media Encoder ! As your proxies should be quicker to render, you could save a lot of time here ! (Note : in that case you should also use the "Use Previews" option !)
Creating And Attach Proxies in Premiere Pro
It exists different ways to create proxies for your project. Let's see the different ones. Be sure to read the "Further Notes" below, there are important advices you should check !
Ingest
"Ingest" in Premiere Pro is used to launch automatically actions while importing a new footage and there is an option to create proxies !
You can enable "Ingest" in the Project Settings (Top Menu : "File" -> "Project Settings" -> "Ingest Settings..."). Once the "Ingest" checkbox checked, you can select what you want to do : "Create Proxies" in this example.
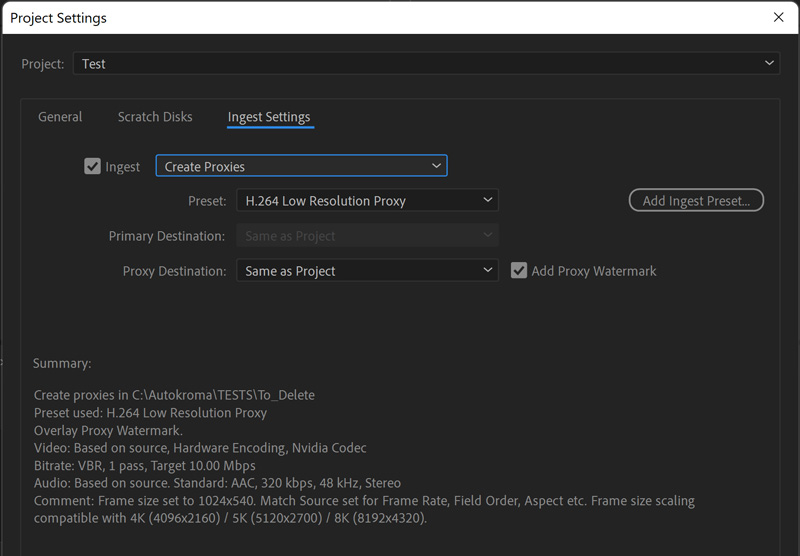
Note that you can make your own custom Ingest Preset in Media Encoder. Once this preset is exported, you can import it with the "Add Ingest Preset" button in the Ingest Settings.
Once the "Ingest" checkbox is ticked, everything will be done automatically ! Every time a media is imported, Proxies are added to the Queue in Adobe Media Encoder, then automatically exported and attached to your Project Item in Premiere Pro.
Media Encoder
You can also create proxies by directly importing your footages inside Media Encoder. Then you will need to attach your proxies in Premiere Pro manually (see next section).

Right Click on a Project Item to Create or Attach an existing proxy
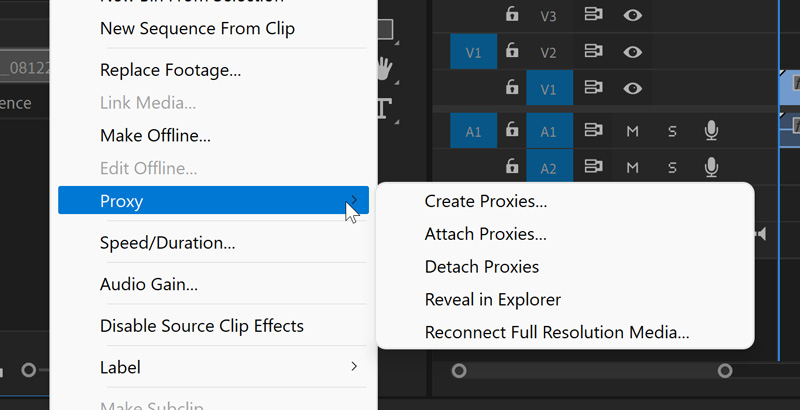
Manually, you can right click on one or multiple Project Item in the "Project Panel" of Premiere Pro and select "Proxy" -> "Attach proxies...". Files will be added to a Media Encoder queue and automatically attached to the project items in Premiere Pro.
Reconnect your original Media to a proxy
If you have imported your proxy inside Premiere Pro and started to edit with it (instead of importing your original media), you can also attach the proxy in the other side : right click on your Project Item "Proxy" media and select Proxy -> "Reconnect Full Resolution Media".
Note : if your the proxy has been initially attached to the project item and the original media has been made offline, you can just use "Relink" instead of "Reconnect Full Resolution Media".
Note 2 : With BRAW files, if you are using the Blackmagic RAW Importer it will be impossible to reconnect your BRAW original file as "Full Resolution Media". The only solution for that is to use our product : BRAW Studio (and not need to buy the premium license for this !). More information in this article.
Add Watermark to your proxies
Depending on the settings you used to create the Proxy, it could be hard to see in the playback (or final export) if you are looking at the Proxy or the Full Res clip. To avoid this issue, you can select "Add Watermark" when creating the proxy (or in your Ingest Preset).
Important Further Notes
Creating Proxies with Lower Resolution
If you want to make proxies with lower resolutions, those proxies should have a "divisible" resolution. For example 1/2, 1/4, 1/8, ..
The existing native proxy presets are compatible with sources of certain standard frames sizes. In the Ingest Settings dialog box (or Create Proxies dialog box), you will have information about those compatible source frame sizes. Be sure it is compatible before creating them, and if not, you will need to create your own preset with the good divisible resolution.
Creating Proxies from High Framerate media
High Framerate footages are generally "interpreted" inside Premiere Pro. So let's say the footage is 120fps, the user could modify the "Interpret Footage" settings and interpret the framerate to be 30fps, resulting on a Slow Motion look.
When the Project Item is interpreted, the proxy needs to be also interpreted. Be careful ! By default the proxy is not created with Interpreted Footage (even if Interpreted Footage is well set in Premiere Pro) so your original footage and proxy will not be synchronized !
So you will need to check the interpreted footage proxies before creation inside Media Encoder !
Here is a good video link on that subject.
Working with Proxies in Premiere Pro
How to Switch / Toggle Playback between your original Media and your proxy
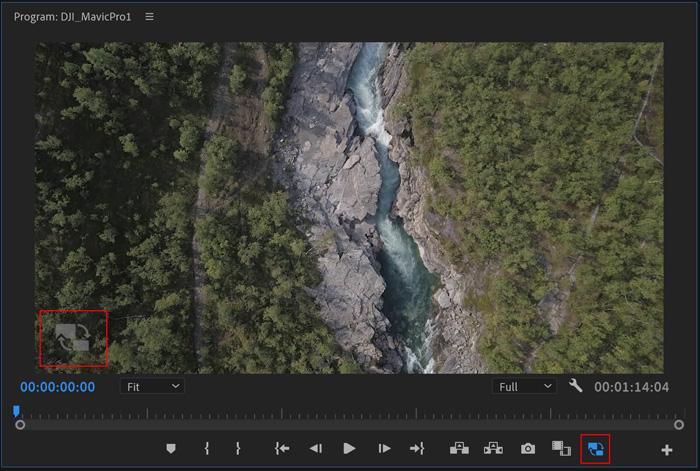
During editing (or at the end for colorists), you may want to see visually how your original footage looks with its full quality. For that, Premiere Pro has implemented a special button to toggle playback between original media and proxies.
This button is located at the bottom of the sequence playback panel. By default is could not be displayed, but you can add it from the "+" button.
The button is blue if Proxies are enabled (it means playback show you the proxy and not the original media), and grey otherwise.
You can also use a shortcut, by default there is not shortcut for it, but you can quickly define one ! In the top menu select "Edit -> Keyboard Shortcuts ..." then search for "Toggle Proxies" and select a key for it !
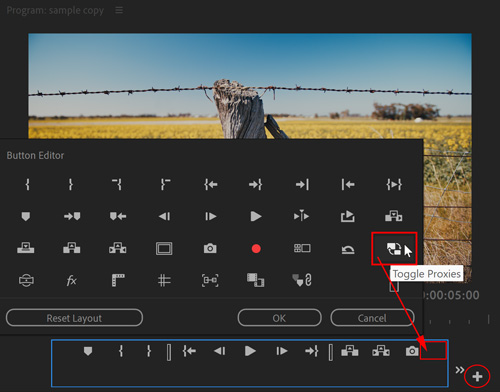
Note : If your original file is Offline and has a proxy attached, the playback will display the proxy even if the "toggle proxy" button is not enabled (grey). That's an example why adding watermark to its proxy can be useful !
Other Indications of Attached Proxy and display state
On your timeline clip you will see a proxy icon if a proxy is attached, and it should be blue if proxy view is enabled.

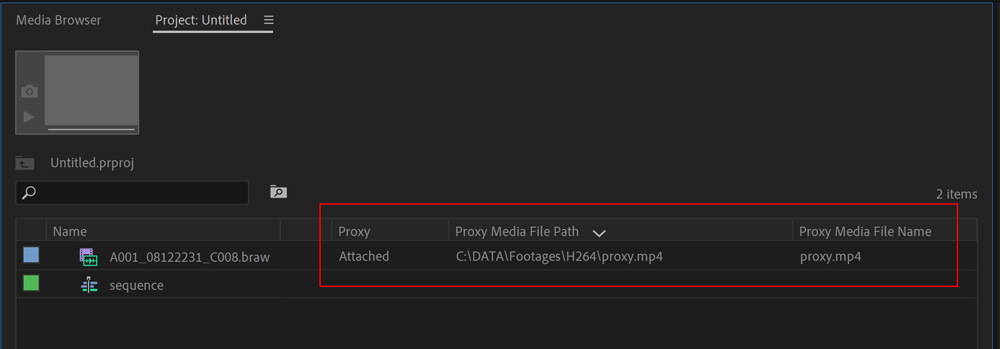
Also in your Project Panel metadata, some metadata should be present (so it is easier to check which Project Item has proxy attached or not !)
Using Proxy with RAW kind of footages : BRAW, R3DRAW, ProRes RAW, ARRI RAW, Nikon RAW, Canon RAW, ...
With RAW kind of footages, such as Blackmagic RAW, RED R3DRAW, Prores RAW, ARRI RAW, Canon RAW, ... you have access to a "Source Settings" effect which gives special settings for those footages (usually grading options).
This effect in Premiere Pro can be found on the "Source" tab in the Effect Control Panel. If you select a clip in timeline, you will need to switch to this tab to get access to the RAW Settings.
When creating Proxies from a RAW footage, you will "burn" those options inside the proxy. So if you change later on a setting in the Source Settings (for example: you change exposure), the proxy will not be changed accordingly.
Depending on your use, it could be annoying or not. When you will switch playback between proxy and the original RAW media (with Source Settings modified), the image will look different.
That's why you should need to create proxy after changing Source Settings, or you will need to re-create them if you need their look to match your original media.
Consolidate or Transfer a Project with proxies
When it's time to save some disk space from empty stuff on your edit or if you want to transfer your project, you could want to consolidate your project.
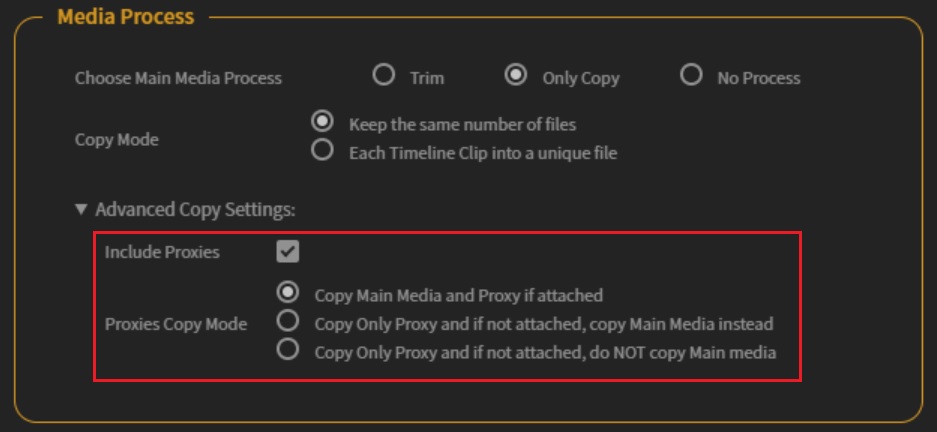
In the native Project Manager, there is a special checkbox to include proxies. However, the Project Manager is known to suffer from some bugs ...
That's why we advise you to use our product "PlumePack". It is an alternative to the Project Manager with more features and less bugs.
With PlumePack you will find better options to work with proxies ! You can choose to only copy the proxies, they will be copied even if main media is offline, copied proxies are re-attached automatically, ..
Check this full article to see what PlumePack can do with Proxies !
Do you think your workflow with proxies could be improved ? Contact us and tell us more about your needs !
