What is AfterCodecs?
AfterCodecs is a native plugin for the whole Adobe CC Video suite, working on both MacOS and Windows. It brings fast and efficient codecs to After Effects’ Render Queue and a new Format choice in Premiere Pro and Media Encoder’s Export window. AfterCodecs also removes a lot of the limitations that are found in regular Premiere Pro and streamlines certain workflows, like uploading to Youtube.
With over a billion daily watch hours, YouTube is by far the largest video streaming website in the world. Uploading to YouTube is something many people do every day. However, their compression algorithm and technical delivery specifications are fairly complex, which can make it difficult to set up your video export correctly for YouTube.
AfterCodecs streamlines this process by offering features that help YouTube process the video faster, as well as a dedicated export preset with all the recommended specifications. These features can save you a lot of time if you upload regularly, and this guide will show you how to use them.
How to export H.264 for YouTube from Adobe Premiere Pro and Media Encoder
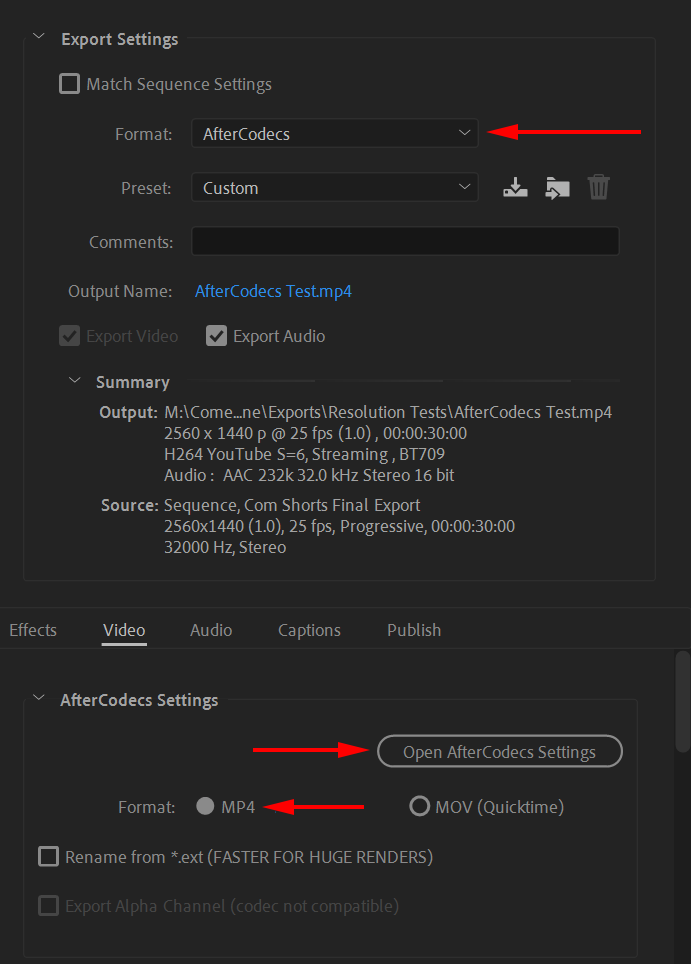
In Premiere Pro, select the sequence you would like to export and go to
File > Export > Media, this will open your export
settings. In Media Encoder, once you have a sequence queued for export, click on
the button in the Format column to open your export settings. From this
point onwards, the process is exactly the same for both applications. Select
AfterCodecs in the Format drop-down menu then, under the
Video tab, select the .MP4 format (you can also select
.MOV; even if YouTube recommends .MP4, it will also
work). Click on “Open AfterCodecs Settings”
Selecting your AfterCodecs settings
On the Video Codec drop-down menu, select H.264 Youtube Upload. This preset follows the recommended YouTube video specifications for bitrate, color and audio. Depending on your sequence’s resolution, framerate and other specs, AfterCodecs will automatically adjust export settings. The only parameter that you can change is the encoding speed, making the process a lot simpler.
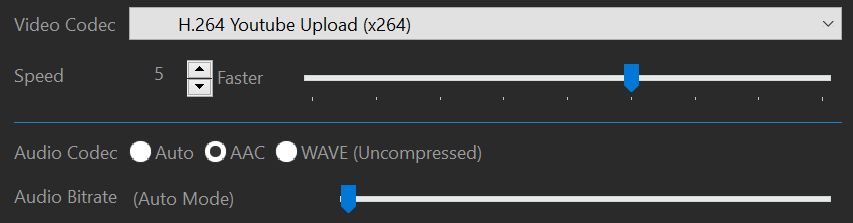
This slider affects compression optimization, meaning lower render speeds will result in smaller files, and faster speeds will result in larger files. Speeds of 7 or above should only be used for quick previews as they will produce lower quality files. You can also select your audio bitrate manually if you wish to do so.
At the bottom of the Encoding tab, you will see a feature called Fast Start. This is an AfterCodecs feature that optimizes your video for web streaming. It will allow your video to start playing quicker online and it also means Youtube will process it faster, making it available sooner after uploading. It causes a slight increase in render time, but the time saved in Youtube processing more than makes up for it.

Once you have selected your desired settings, click OK on the AfterCodecs menu. If you’d like to upload as quickly as possible, you can also use this in conjunction with Premiere Pro’s direct YouTube upload feature under the Publish tab.
Click Export in PrPro or the play button in AME and you’re done!
How to export H.264 for YouTube from After Effects
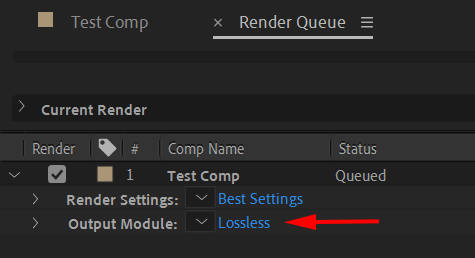
First, add your composition to the After Effects Render Queue. In the Render Queue tab, click on the button shown on the right to bring up your output module settings.
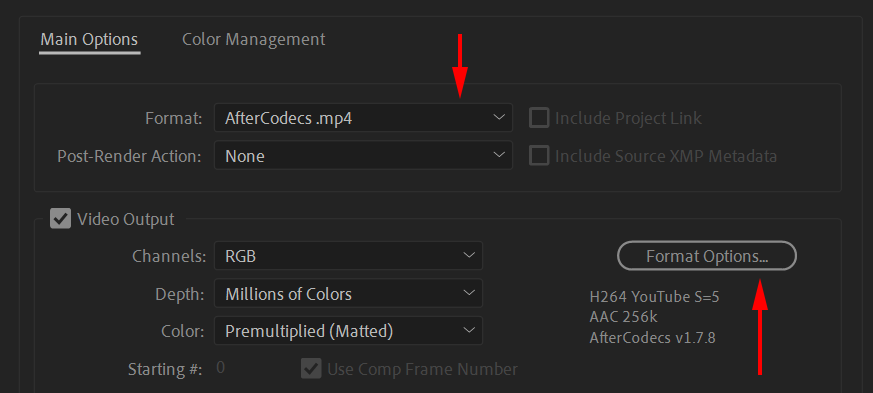
Select AfterCodecs .mp4 from the format drop-down menu and click
on Format Options to open the AfterCodecs settings (you can also select
AfterCodecs .mov; even if YouTube recommends .MP4, it will
also work).
For all information required on setting up your export, please refer to “Selecting your AfterCodecs settings”, earlier in this article.
Once everything is configured to your liking, click OK on the AfterCodecs settings menu. Click OK on the Output Module settings.
Click Render in the After Effects queue and you’re done!