You need more explanation about PlumePack options ? In this article you find find detailed information about each option : when to use them, their purpose,...
Category : Media Process
Option : Choose Main Media Process
With this option you can choose how you want PlumePack to process your media.
Note that your original media will always stay the same (not moved/modified/removed).
Trim
Premium Feature
If possible your footage will be trimmed losslessly based on its use in your project.
Lossless Trimming removes the extra frames in each footage (more or less depending of the handle option), based on their use in your current project. No re-encoding is involved, the shorten media will keep its own codec and quality: you keep the exact pixels values from your original media.
Only Copy
Your footage will stay the same and will only be copied by PlumePack.
No Process
Premium Feature
Your media will not be trimmed or copied.
With this option, you can create a cleaner copy of your project for example (removing unused items, or get only a selection of sequences and their deps).
If you want to transcode your media, you could for example use this option to clean the project first, and then use the native Project Manager to transcode the files.
Trim Options
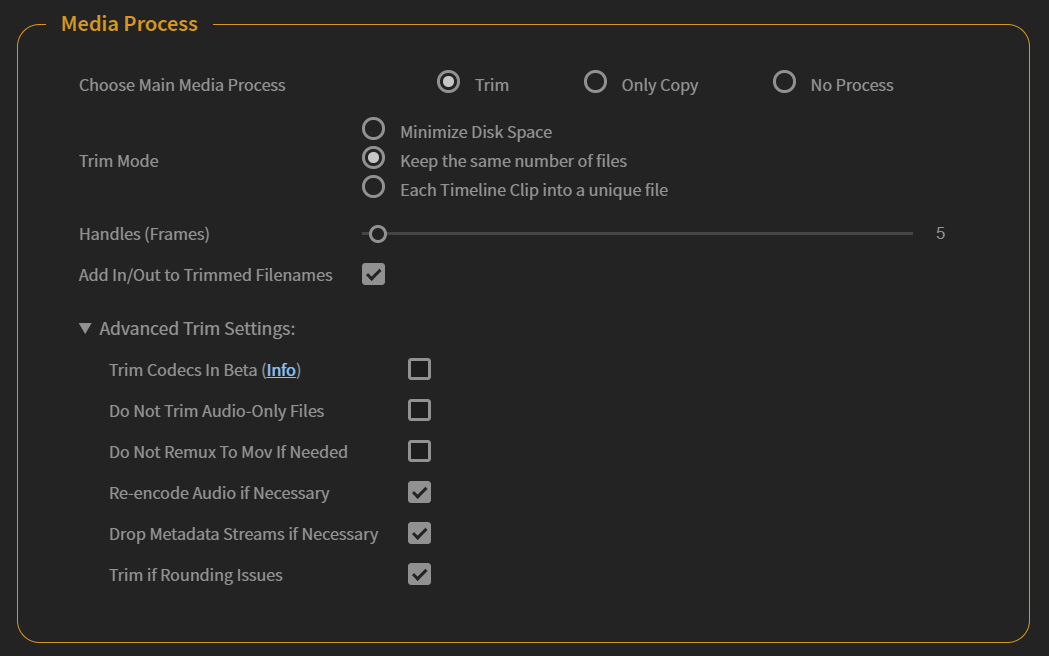
Option : Trim Mode
You have access to three trim mode for now:
Minimize Disk Space: this mode is the most optimized in terms of space saved. If a media is used multiple times with different parts of it, PlumePack will create multiple output files corresponding to each part of the source. PlumePack will optimize the number of output files for each source file. For instance if two timeline clip have overlapped frames, PlumePack will create only one output file for these two timeline clips.
Keep the same number of files: this mode will only create one output file for each input media. The file will be trimmed based on its use on your project with inPoint and outPoint corresponding to the min and max frames used.
Each Timeline Clip into a unique file: PlumePack will create one output file for each timeline clip of a media. This will not optimize the space saved and can lead to a bigger project than the original one.
Option : Handles
If your footage is used in your timeline from frame N to frame M, trimming will trim your footage from frame (N - handle) to (M + handle).
It could be useful for example if you want later to edit your project and change a bit your in/out points, or if you want to add or set longer transitions between clips.
Note : At the right of the slider, you can click into the number to set the precise number you want.
Option : Add In/Out to trimmed Filenames
By enabling this option, any trimmed footage will have its filename finishing by "_[inFrame]_to_[outFrame].ext". For audio only media, the In/Out frame number will be replaced by sample number.
For example :
- footage.mov => footage_56_to_123.mov
- audio.wav => audio_1022_to_2645.wav
It can be useful not to confuse trimmed media with original and also how this media was produced.
Option : Do Not Trim Audio-Only Files
Premium Feature
If enabled, media with only audio streams will not be trimmed during the PlumePack process.
This option is useful if you don't want to trim your audio files and keep full audio files.
Advanced Trim Settings
In PlumePack you also have access to some advanced settings to deal with special cases.
Option : Trim Codecs/Containers In Beta
We need you ! The new codecs or containers we want to support in PlumePack would need more tests on some different files to be in the official release.
If enabled, this option will allow trimming for this new codecs and containers: so you will be able to test if it works on your side (don't forget to check the footages !).
Please send us your feedback !
If it fails, you can upload your file directly at: https://mega.nz/megadrop/EV9rqKYs4QQ. We will not share it with anyone, it will only be used for our internal tests.
Option : Re-encode Audio if Necessary
Premium Feature
This option will affect only AAC Audio files and also some ProRes files which contain AAC Audio codec.
For these files, re-encoding Audio is needed. New audio will keep the same bitrate as the original audio.
PlumePack uses the high quality Fraunhofer SDK encoding library to re-encode those audio files, so you should not hear the difference from the original.
Disabling this option will exclude those files from trimming, instead they will be copied.
This option is enabled by default because mostly people don't care about the Audio Codec inside their footages and if Audio is re-encoded or not, as long as they can't hear the difference from the original.
Option : Remux MXF To MOV If Necessary
Premium Feature
If disabled, Media which needs to be Remuxed to MOV for trimming will be copied instead.
Some MXF Files with a H264/H265 video stream codec are facing Trimming issues (missing frames, frame order changed, color shift, ..) with FFmpeg (the open source tool we are using in our Trim Engine). Fixing those issues was not easy, and we found that remuxing the files to MOV instead of MXF was fixing those issues.
Remuxing means to change the container and extension of the file, but still without re-encoding. The file codec stays the same, as well as the Frames pixels data.
Option : Drop Metadata Streams if Necessary
Premium Feature
This option could affect some particular footages with metadata information stored as "Stream" inside the file.
Storing Metadata as Stream often means that the information depends on frames.
For example in a GoPro footage, a Metadata Stream can be the GPS position of the Camera along the footage.
For these files, PlumePack automatically detects an unknown Metadata Stream on the footage and depending on this option, decides to trim the footage and drops (removes) this metadata from the trimmed file or excludes this file from trimming (the file will be copied instead).
This option is set to "Enabled" by default because users mostly don't care about those Metadata and don't even know of their existence.
Option : Trim if Rounding Issues
Premium Feature
This option is useful only if you are using media inside a sequence that have a different frame rate than their sequence.
In this particular case, when Premiere Pro want to display a given frame of the sequence, the frame of the media with a different frame rate is rounded and this is dependent to the first frame of the clip used in the timeline.
This can lead to duplicate frames or frames missing when reading the timeline. Premiere Pro users generally change the "Footage Interpretation" of their clips for that purpose : so footage and sequence have the same framerate.
So if you want trim the beginning of the clip which have a different frame rate than its sequence, the first frame of the clip will not be the same. So the duplicate/missing frames will be moved, and you will not have the exact same displayed frames.
For example, if 2 frames were duplicated initially at a time given in timeline for the current clip, after trimming the duplicated frames will be at another time.
If you enable this option, this means you don't care about this little issue and you want to trim your clip from inPoint to outPoint.
If you disable this option, you will force PlumePack not to trim the beginning of the file and avoid this little issue but the final project could be bigger.
Option: Trim if Color Space Issues
Premium Feature
If you enable this option, some specific trimmed file could be visually different because a metadata changed in the file after trimming it. The pixel data is the same than the original, but Premiere Pro (and other players) will decode the file in a different way.
For now this issue has been detected only on MXF H264 files with "HIGH" profile. Not all those files will be affected by the issue, but we did not find a better way to detect it. That's why we also implemented this special setting. We hope to find a fix for it in the future but it could take time.
So if you disable this option, MXF H264 files with "HIGH" profile will be copied instead of trimmed, to avoid the Color Space issue.
Option: Trim if file has an Alpha Channel
Premium Feature
If you disable this feature, files with alpha channel (transparency) will not be trimmed but copied instead. It could be useful depending on your use of such files.
Note: it can be used to avoid the problem of files with Pre-multiplied Alpha Channel which are "converted" to Straight after trimming, because of a metadata not present in the trimmed file.
Options: Omit First B-Frames if Necessary (Black Frame Risk)
Premium Feature
BE CAREFUL OF THIS OPTION : You could end up with Black Frames.
Some H264/H265 Footages with Groups Of Picture (GOPs) are recorded with B-Frames before the first keyframe (often 2 B-Frames).
Our trim engine, using FFmpeg, can't trim those files without re-encoding because it only accepts files starting with a Keyframe (limitation from ffmpeg). Before this option was available in PlumePack, it was always false and so if the beginning of the file was used, the file was never trimmed but copied instead (otherwise it would have been shifted).
Now with this option enabled, a file starting with B-Frames and with the beginning of the file used in the project will be trimmed anyway BUT it will still omit the first frames. So your footages will not be shifted in the timeline, but first B-Frames will become black if used and visible in the project.
Copy Options
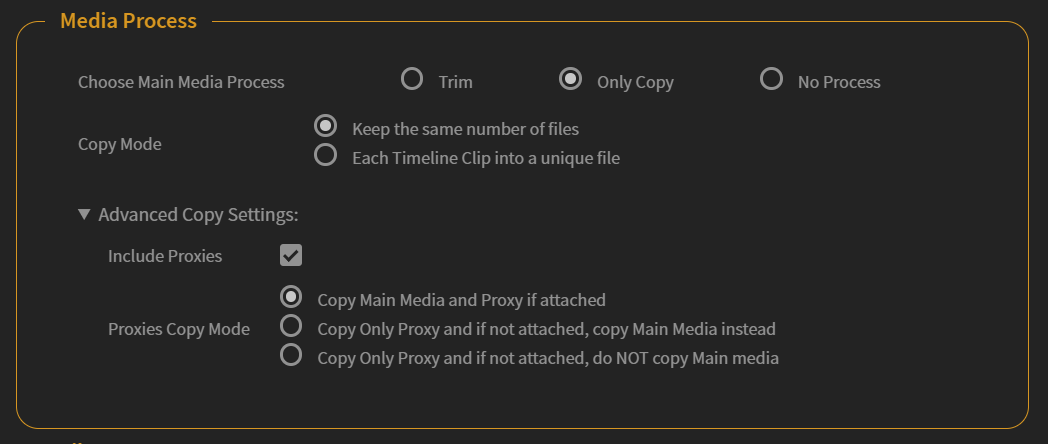
Option : Copy Mode
There are two copy mode available for now.
If you choose Keep the same number of files: PlumePack will copy each file only once.
If you choose Each Timeline Clip Into a unique file: PlumePack will copy a file as many times as there are timeline clip using this file. This is especially useful for VFX workflow and is absolutely not interesting if you want to reduce the disk space of the project.
Advanced Copy Settings
In PlumePack you also have access to some advanced settings to deal with special use cases.
Option : Include proxies
Premium Feature
By enabling this option, Proxies of Media kept during the PlumePack process will be copied and replaced in the PlumePacked Project.
Option : Proxies Copy Mode
Premium Feature
With this option you have more controls about how main media and proxies should be copied or not.
Proxies Copy Mode : Copy Main Media and Proxy if attached
PlumePack will copy each main media but also its proxy if attached.
Proxies Copy Mode : Copy Only Proxy and if not attached, copy Main Media instead
PlumePack will only copy proxy if attached and not Main Media. If proxy is not attached, Main media will be copied.
Proxies Copy Mode : Copy Only Proxy and if not attached, do NOT copy Main media
With this mode enabled PlumePack will not copy Main Media but only Proxies linked. If no proxies are available, nothing will be copied. Project Items won't be offline at the end of the process but their High Res Media path will stay the same. If the project collected is opened somewhere else High Res Media will become offline and if there is no Proxies the whole Project Item will become offline.
Option: ByPass Trimming Estimation
Premium Feature
If enabled, the analysis will skip Trimming Estimation and speed up the process.
No Media Process Options
Option: Remove Productions References
Premium Feature
Only available for No Media Process mode.
If the project PlumePacked is part of a Premiere Pro "Production", some of its media could be linked to other project of that Production. Those media are called "Productions References". With those references, if you modify the project item in some ways in the "Master" project, the "Child" project will be affected.
With this option used, the new project will be independent from any other project and so from any Production.
Option: ByPass Trimming Estimation
Premium Feature
If enabled, the analysis will skip Trimming Estimation and speed up the process.
Category : Filter
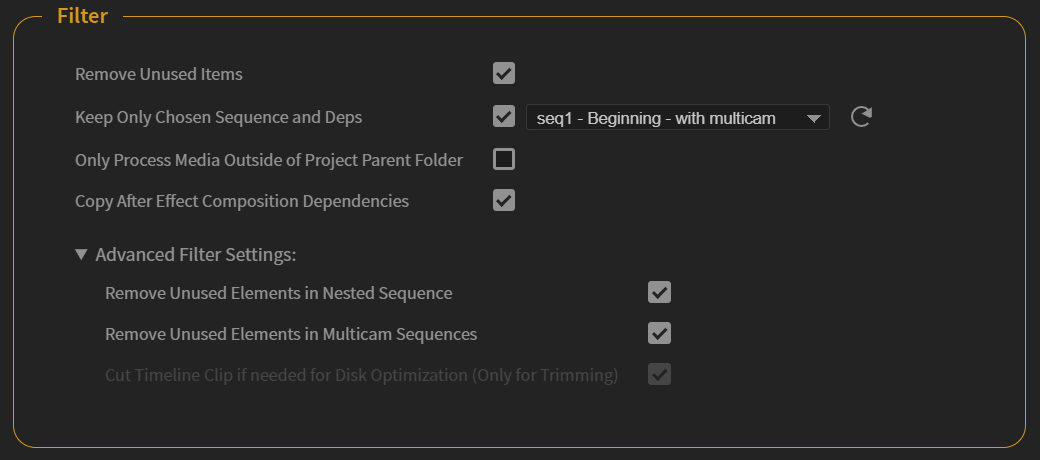
Option : Remove Unused Items
This option will remove any unused items imported into the project. It can be for example some footages you imported but didn't use in any timeline.
If you set this option to false, nothing will be removed from your original projects if it could not be replaced (replaced by copied/trimmed footage).
Option : Keep only Chosen Sequences and Deps
With PlumePack you can choose to export all sequences in your project or choose to export only a selection of Sequences.
By selecting the "Chosen Sequences", only elements which are in those sequences OR in the nested sequences which are inside those sequence (OR nested sequences inside the nested sequences, etc ...) will be exported at the new location.
Sequences can be selected using the corresponding checkboxes If you don't find a sequence name you would want in the list, hit the "Reload" button.
Other Premiere Pro items (Media and also any other item not used from the Main Sequence) will be deleted.
This option can't be used if "Removed Unused Items" is set to false.
Option : Only Process Media Outside of Project Parent Folder
Premium Feature
If enabled, this option will ignore all files which are inside the .prproj parent folder AND in its subfolders. So those files will not be copied / trimmed and they will still be linked to their original location.
For the copy process for example, it can be really useful to save you copy time if you just want to gather all media at the same place (generally in this folder).
For the trim process, note that it doesn't trim files which are already in the .prproj folder or subfolders, even if it could maybe save you some free space. If you are interested by this feature, please contact us.
Option : Copy After Effect Composition Dependencies
Premium Feature
If enabled, media used inside After Effect Composition will be copied next to the copied .aep file.
If you have a Premium License you can disable this feature. This can be useful if you have a massive After Effect Project and you only use a small part of it inside Premiere Pro because PlumePack is copying all media used inside the full After Effect Project.
Note : in FREE mode, this option is always enabled
Advanced Filter Settings
In PlumePack you also have access to some advanced settings to deal with special cases.
Option : Remove Unused Elements in Nested Sequence
Premium Feature
Nested Sequences are often used partially.
For example you could have placed some clips at the end of the sequence, just for editing facilities. When you want to PlumePack your project, you could want to clean those clips (because not used in the parent sequence).
With this option enabled, unused clips in parent sequence will be removed. If trimming is enabled, the used clips will be trimmed based on their use in the parent sequence.
Note : in FREE mode, this option is always disabled
Option: Only Process Used Angle in Multicam Sequences
Premium Feature
If enabled, when a Multicam clip references one track of the associated Multicam sequence, only this track will be considered as "used" for this clip. So for example if a track in a Multicam Sequences is never referenced in any Multiple Clip, the media on this track will be set as "unused" and so should not be present in the final project.
If disabled, a Multicam sequence will be considered as a Nested sequence, and the angle used in the Multicam Clip will not be used to determine which track is used or not : each track of the Multicam sequence will be considered as used for the time part used in the above clip.
Option : Removing Unused Elements in Multicam Sequences
Premium Feature
Decide or not to save space on your Multicam Sequences.
With this option enabled, unused clips in parent sequence (generally a "Camera" not used, or Audio not used) will be removed. If trimming is enabled, the used clips will be trimmed from their use in the parent sequence.
Note : With this option enabled but not the next option : "Cut Timeline Clip if needed for Disk Optimization" enabled, trimming should not save a lot of space (only removing first and last unused parts, but not the unused in-between parts)
Note : in FREE mode, this option is always disabled
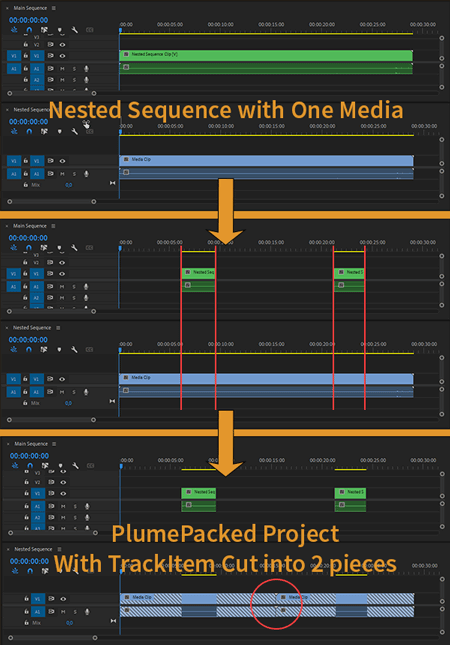
Option : Cut Timeline Clip if needed for Disk Optimization (Only for Trimming)
Premium Feature
If a media timeline clip is used at different parts from a parent sequence, the best optimized trimming strategy will need to export this timeline clip into different parts.
When replacing with the trimmed different parts, PlumePack needs to cut the trackItems into multiple pieces to relink all of them to the corresponding file part.
Note : This option is only used when "Remove Unused Items" is used, "Keep only Chosen Sequence and Deps" is used and "Remove Unused Elements in Nested Sequence" OR "Remove Unused Elements in Multicam" is used.
Category : Transform
Option : Data Structure Mode
There are three output Data Structure Mode for now :
Premiere Pro Bins Structure:
PlumePack will use your Premiere Pro Project Panel Bins Structure to create the output folder data structure. For instance if you have imported a Media in Premiere Pro into a Bin called "Rush", PlumePack will put this Media (trimmed or copied) into a subfolder called "Rush".
Flat Data Structure:
PlumePack will put every Media into the same folder.
There are two exceptions:
- Media with dependencies will have an output subfolder with the Media (trimmed or copied) and its dependencies inside. It's the case for Image Sequence, AE comps or RAW kind of files with Sidecar files attached.
- For safety reason RED files will be placed into a subfolder.
Original Folder Structure on Disk: Premium Feature
PlumePack will analyse the Disk Data Structure of your Media and recreate this Data Structure inside the output folder.
The computation of the final structure is based on the "Most Common Ancestor".
Let's take a simple example (based on Windows structure, but it will be the same for Mac !).
If you have 3 medias Filepaths at:
- C:/MainFolder/CommonFolder/SubFolder_1/media_1.mov
- C:/MainFolder/CommonFolder/SubFolder_2/media_2.mov
- C:/MainFolder/CommonFolder/SubFolder_3/SubSubFolder_4/media_3.mov
The common Ancestor is: C:/CommonFolder
The Final Relative Structure for your media will be :
- SubFolder_1
- media_1.mov
- SubFolder_2
- media_2.mov
- SubFolder_3
- SubSubFolder_4
- media_3.mov
- SubSubFolder_4
Now, if I add a 4th media to the project, at :
- C:/MainFolder/OtherFolder/media_4.mov
The common Ancestor is now: C:/MainFolder
The Final Relative Structure for your media will be :
- CommonFolder
- SubFolder_1
- media_1.mov
- media_2.mov
- SubFolder_3
- SubSubFolder_4
- media_3.mov
- SubSubFolder_4
- SubFolder_1
- OtherFolder
- media_4.mov
The minimum Common Ancestor is the first level folder of a Disk. What does that mean ?
If you have those paths for your files :
- C:/MainFolder/CommonFolder/SubFolder_1/media_1.mov
- C:/MainFolder/CommonFolder/SubFolder_2/media_2.mov
- C:/OtherFolder/media_4.mov
- D:/AnotherFolder/SubFolder_3/media_5.mov
The Final Relative Structure for your media will be :
- SubFolder_1
- media_1.mov
- SubFolder_2
- media_2.mov
- OtherFolder
- media_4.mov
- SubFolder_3
- media_5.mov
For the same Disk "C", the common Folder is the root Folder (at C:/), but as it is below the limit of 1 subfolder, there are several CommonFolders here :
- C:/MainFolder/CommonFolder
- C:/OtherFolder
- D:/AnotherFolder/SubFolder_3
Option : Give each Media a Unique Filename
Premium Feature
If enabled, PlumePack will make sure every copied or trimmed Media has a Unique Filename (without extension). So if you have a media "foo.braw", a media "foo.mov", and a media "foo.mxf", the second will be named "foo_pp001.mov, and the third "foo_pp002.mxf".
It can be particularly interesting for relinking Media if you have a workflow where extension will change (after Color Grading for example and returning to Premiere Pro).
There is an exception for RED files to avoid any issues.
Option : Filename - Use Project Panel Item Name
Premium Feature
If enabled, PlumePack will use the Premiere Pro Project Panel Item Name as Filename for the PlumePacked Media. Note: Paths conflicts are taken into account (no media removed because 2 project item have the same name).
Option : Move Project Item Multiple Parts To Sub-Bin
Premium Feature
When trimming with "Minimize Disk Space" or using "Each Timeline Clip into a unique file" mode (Copy/Trim modes), one original Project Item could be transformed into multiple ones, for example for each parts of the trimmed file.
If enabled, those different new Project Items coming from the original one will be placed into a Sub-Bin with the name of the original Project Item.
If disabled, all those new clips will be placed in the same Bin than the original Project Item.
Advanced Transform Settings:
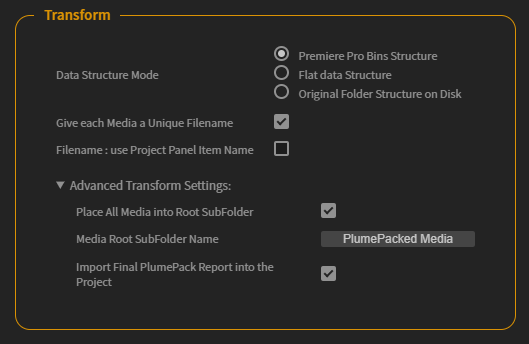
Option : Place All Media into Root SubFolder
Premium Feature
The Media Root SubFolder is the folder which will contain all the Media (Trimmed/Copied) from your new Project after PlumePack consolidation. If enabled, PlumePack will create a default Root subfolder next to the new PlumePacked project to put every media inside. Your media files will be placed inside this subfolder, following the Data Structure Mode selected. If disabled, all your media will be place directly next to the prproj without subfolder, following the Data Structure Mode selected.
Option : Media Root SubFolder Name
This is a Premium Feature.
If the Media Root SubFolder is created (see param above : Place All Media into Root SubFolder), then you can decide of its name here ! The default name is "PlumePacked Media".
PlumePack Toolbox Options
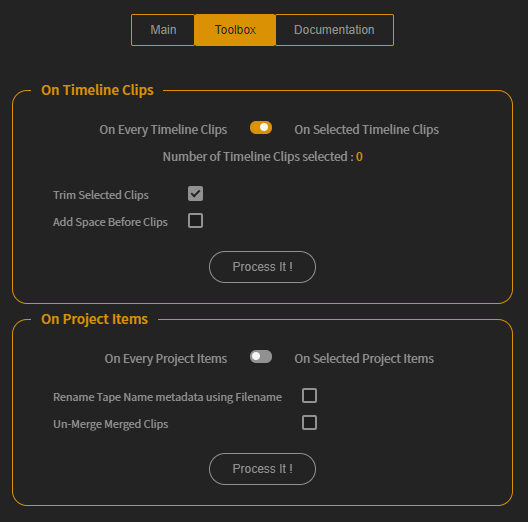
Selection Mode
If "On Every Timeline Clips" is selected then all options checked will be applied to all timeline clips in the current Project. Same for the "On Every Project Items" : the process will be applied to all Project Items in the project.
If "On Selected Timeline Clips" is selected all options checked will be applied only on your selection of Clips in the current selected timeline. You will be able to see how many Timeline Clips are currently selected.

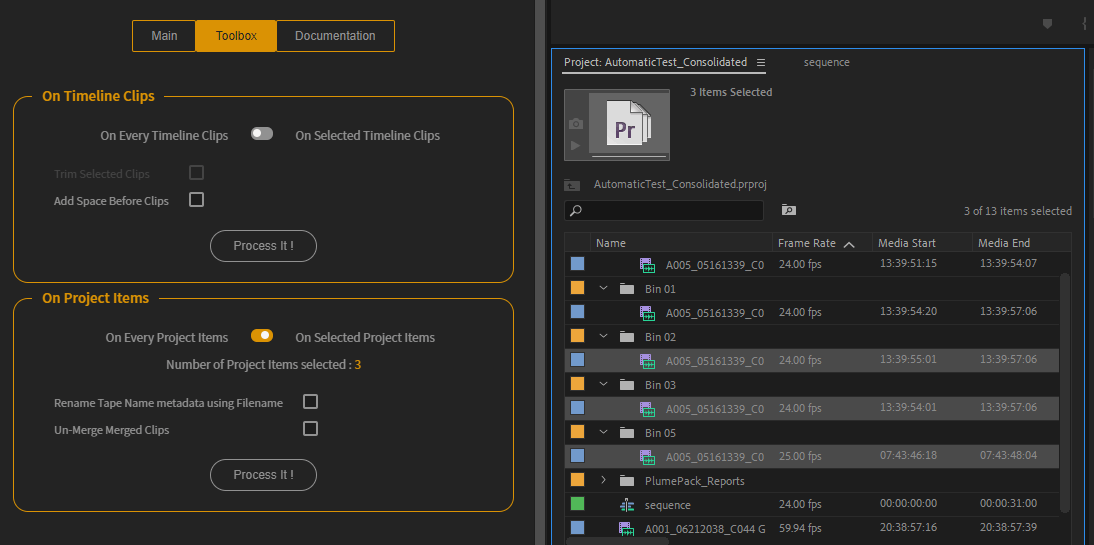
Same for "On Selected Project Items" : you will need to select the project items before in the Premiere Pro "Project" tab.
Timeline Clip Tools
Tool : Trim Selected Clips
Premium Feature
Note : this tool is only available on the selection mode and not for Every Timeline clips.
With this tool : select your clips, hit the checkbox and the media will be trimmed according to the In/Out of the selected clips, and the clips will be replaced automatically !
Tool : Add Space Before Clips
Premium Feature
With this tool : add space before all selected clips. It has been asked in the Premiere Pro uservoice : some people wanted to quickly add a desired amount of empty frames between all their timeline clips (generally after dragging the clips from the Project panel).
Project items Tools
Tool : Rename Tape Name metadata using Filename
Premium Feature
If enabled, Project Items will have their Tape Name metadata in the Project Panel of Premiere Pro renamed with the Filename of the Media.
Tool : Un-Merge Merged Clips
Premium Feature
One of the problem of the Merged Clips is that it is impossible to revert this action.
With this tool : you will be able to unmerge some clips quickly ! The clips in your timeline will become regular clips and the merged clip will be removed.
Tool : Reorder Tracks
Premium Feature
With this feature you will be able to change the order of your tracks in Premiere Pro.
You can learn more about this feature and how it works at this link !
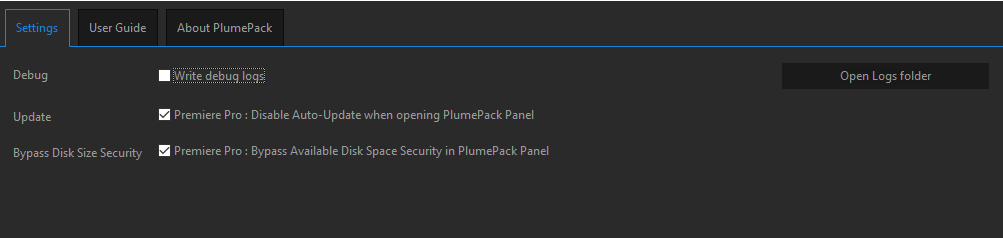
Other Hidden Options
Those advanced options are available from the popup "Settings & License" (button at the bottom of the PlumePack Panel).
ByPass Disk Space Security
We have added a special option into PlumePack Desktop called "Bypass Available Disk Space Security" for special use cases.
When using some special drives, sometimes PlumePack could badly estimate the remaining disk space available on your drive, and so stop the process. By using this option, you will bypass this security.
Want more options for PlumePack?
You tell us!
How do you use PlumePack, what are your pain points? Contact us to tell us ! We might find more solutions to your issues