What is AfterCodecs?
AfterCodecs is a new native plugin for the whole Adobe CC Video suite, working on both macOS and Windows. It brings fast and efficient codecs to After Effects’ render queue and a new format choice in Premiere Pro and Media Encoder's Export Window.
AfterCodecs allows you to export multichannel with a wide variety of codecs, but first you have to understand how Premiere Pro itself handles multichannel. If you would like to export a file with multiple tracks containing one or several audio types, you need to create a multichannel sequence. This article will cover general information about multichannel sequences and how to create them while including specific audio types. For more information about these various audio types, please refer to our audio import/export article.
Creating your multichannel sequence
Go to File > New > Sequence and, under the Tracks tab, select Multichannel on the Master drop-down menu to create your multichannel sequence. Once you have created that sequence, you can choose up to 32 audio channels. You can also change the number of channels at any moment.
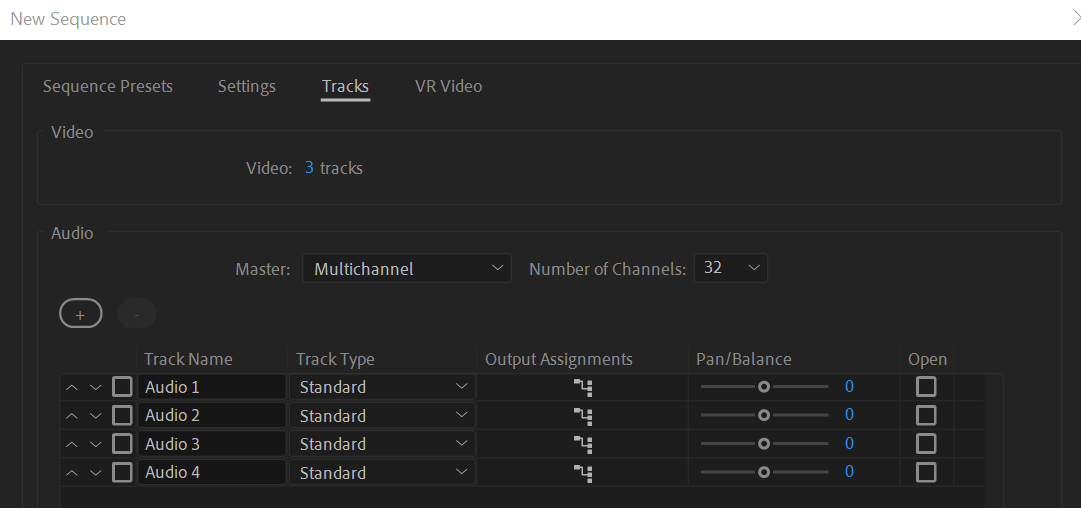
However, if the sequence is set up as anything other than a multichannel master, it is impossible to change that later. For example, a 5.1, stereo or mono sequence cannot be changed to multichannel. You would have to create a new sequence set to multichannel and then copy the contents of your original sequence over.
Master Channel Output
To setup your speaker output configuration, go to Edit > Preferences > Audio Hardware.
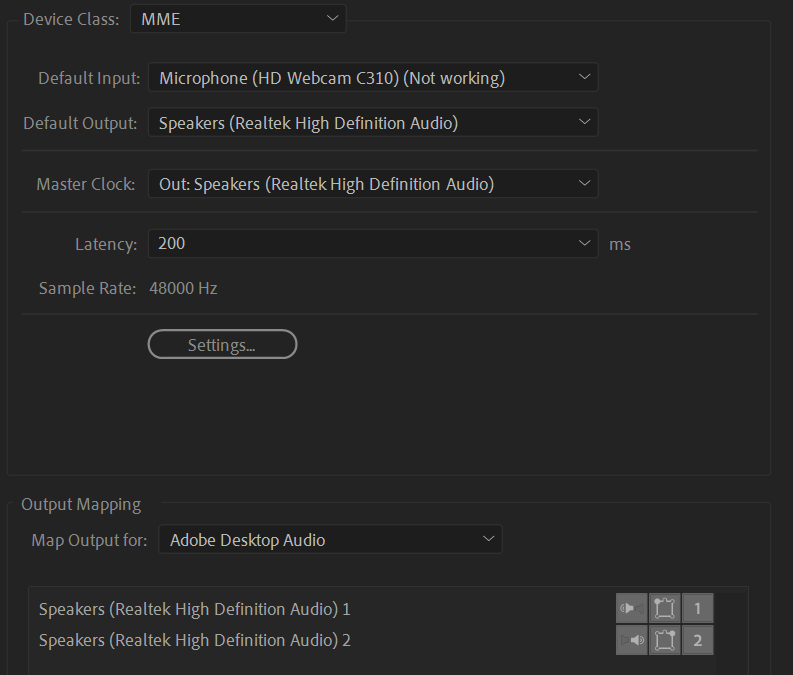
Your desired speaker configuration should already be set by default. The number on the bottom right refers to which channel each speaker will output. Your settings will look similar to the screenshot above if you have a stereo output speaker setup. To find out more about audio hardware settings, check out our Premiere Pro Audio basics article.
The master will play through the channels that have a speaker assigned to them in the PPro audio hardware settings. So, if you have 2 speakers set as a stereo pair (LR), channels 1-2 essentially become your master output. This is why, in your multichannel sequence, it is a good idea to have channels 1-2 be your stereo full mix and use the rest as discrete channels for other sources, like dialogue or M&E. Having 1-2 be stereo full mix is also standard practice in post-production.
Track Channel Assignment
Each track in your sequence needs to be assigned to a channel output, as they will all be assigned to channels 1-2 by default. Unless your audio hardware settings are set up differently, you will only be able to hear audio from channels 1-2 of your sequence. So, to hear all the other channels of this sequence, you have to re-route its other tracks to outputs 1-2 of your master.
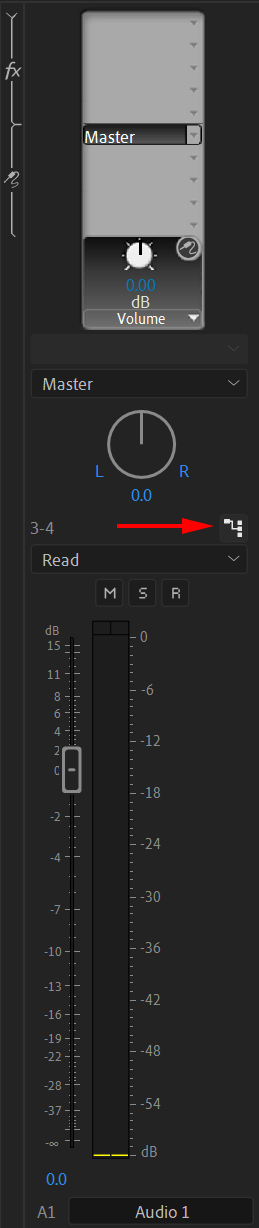
You can re-route the tracks to your desired channel by going to the Audio Track Mixer panel, then clicking on the Set Track Output Channel Assignment button (see left picture below). You can also re-route each track to your master's output channels 1-2 by selecting that option on the Sends drop-down menu at the top of each track (same picture). This is the best way to make sure all your tracks are audible.
Below, on the right, you can see the Track Output Channel Assignment menu, where you can direct each track to the desired output channel. It is worth noting that longer sequences with 32 channels of high-quality audio can make Premiere unstable.

Using Various Audio Types in a Multichannel sequence
Now we will see how to create a multichannel sequence containing the various audio types covered in our audio import/export article. The sequence will be created from scratch, as it is easier to organize the tracks this way, but the following procedure can be done by adding tracks to an already existing multichannel sequence.
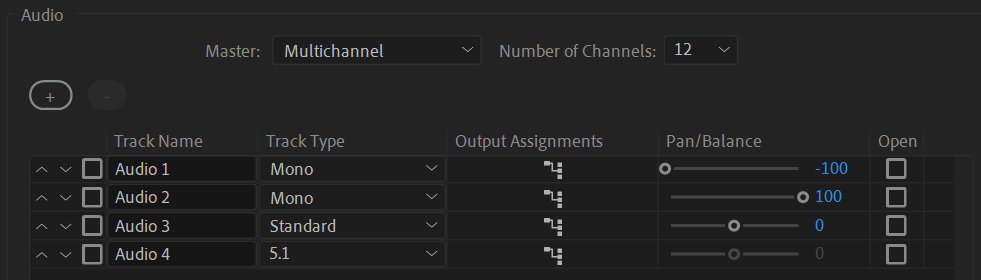
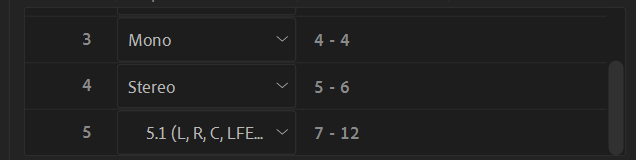
In this case, I want to include mono split tracks, a stereo track, and a 5.1 track all in the same sequence. Based on that, I need to calculate the number of channels needed in my sequence, which, in this example, comes to 12. If you are not sure how many channels you need, it is helpful to break it down like this:
A1-2: Stereo Full Mix A3-4: Mono Split Tracks (Dialogue) A5-6: Stereo (Music) A7-12: 5.1 Mix
Here is what it looks like when creating the sequence:
Keep in mind that all of these settings (apart from the master track) can be changed after creating the sequence.
As you can see, I have selected the Mono track type and panned A1/2 to L/R using the Pan/Balance slider to create my split tracks.
A3 is just a standard stereo track. A4 is my 5.1 mix.
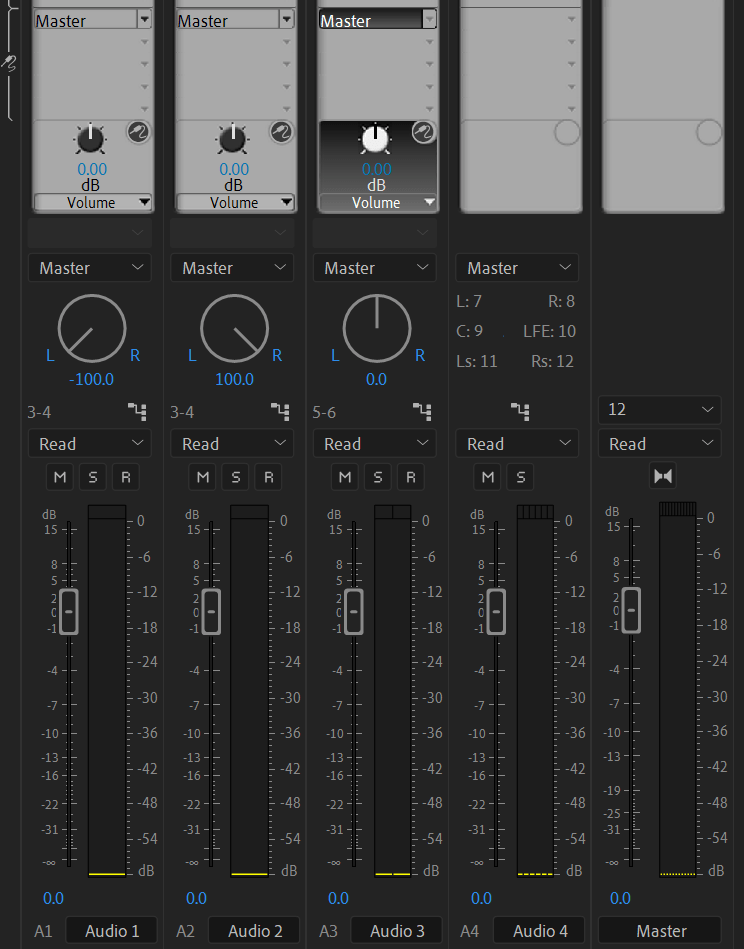
Now you need to make sure that each track is playing through the correct channel. This can also be done after the sequence is created, in the Audio Track Mixer, as seen below. You can use the Set Track Output Channel Assignment button previously mentioned. The selected channels for each track are displayed next to that button.
As you can see below, I have followed the track layout from my breakdown. Remember to also route all your tracks, (apart from 5.1) to your master to create your full stereo mix, which in this case contains a dialogue and a music track, on A1/2.
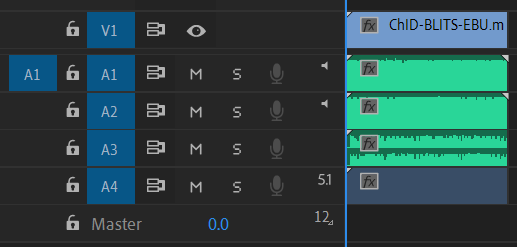
Your multichannel sequence timeline should now look more or less like this:
Once your channels have been assigned properly, open up your Export Media menu. A few formats allow you to export multichannel files, but we will use Quicktime ProRes, as that has the most options and it is the easiest to set up. Under the Audio tab, you will find the Audio Channel Configuration menu.
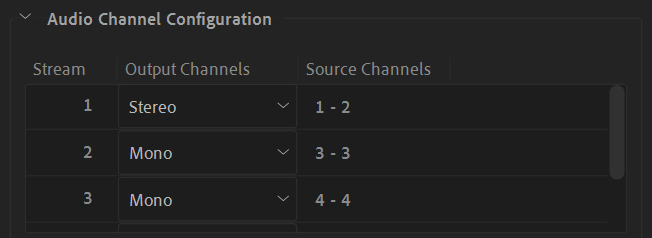

All you have to do now is to set up the channel configuration to match the track layout you have already prepared, as seen above. Choose Discrete as channel layout. Once you are happy with your settings, hit Export and you are done!
If you followed the example above, you should now have a file with 5 tracks and 12 channels of audio. You can change between those 5 tracks using a player like VLC. And all 12 channels will be usable if you need to import the file back into Premiere.
Isolating the LFE track in your 5.1 mix
Unfortunately, the Premiere pro 5.1 audio panner will not allow you to isolate the LFE track, so a workaround with multichannel sequences needs to be used instead. This process is only necessary if you have broken down your 5.1 into 6 mono channels for mixing purposes.
If your 5.1 file is contained within a single track, like in the example multichannel sequence above, you do not need to do this, as the LFE should be isolated already. To find out how to isolate LFE, watch this tutorial from 13:02 (or watch the full video to find out how to mix 5.1 in Premiere).