What is AfterCodecs ?
AfterCodecs is a new native plugin for the whole Adobe CC Video suite, working on both MacOS and Windows. It brings fast and efficient codecs to After Effects’ render queue and a new format choice in Premiere Pro and Media Encoder's Export Window.
AfterCodecs offers more advanced audio features in Premiere Pro, but first this article will take you through some of the first stages of setting up your audio in Premiere.
There are myriad of audio features, tools and settings in Premiere Pro, especially since the addition of the essential sounds panel in 2017. We will go through the audio settings configuration, importing sound clips, audio channel mapping and synchronization. Setting all this up correctly can save you a lot of hassle during your edit or when the time comes to export.
Configuring your audio hardware settings
Even though your audio hardware settings are almost always configured correctly by default, it can be helpful to have some understanding of how they work. If your audio seems to be working fine, you can skip this step if you wish. To access these settings, go to Edit > Preferences > Audio Hardware.
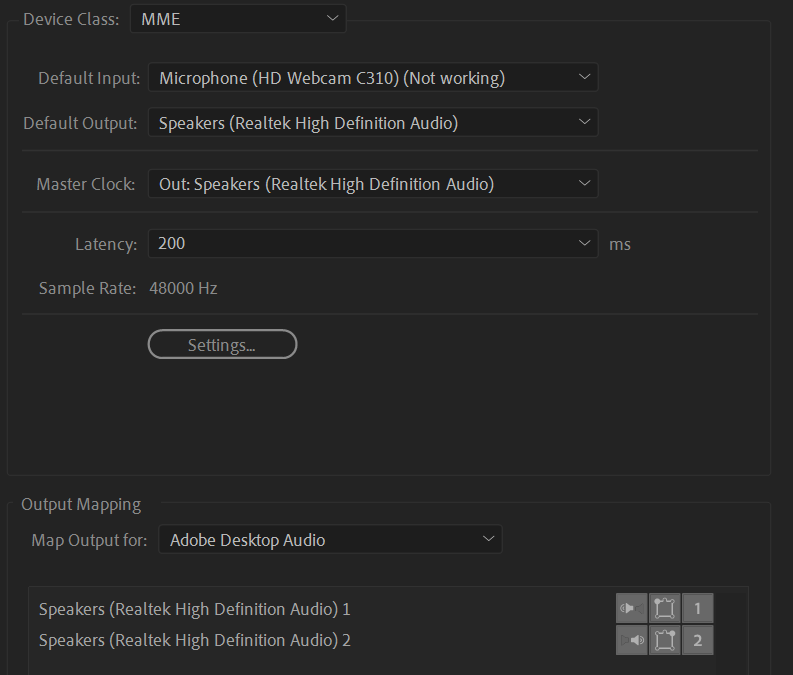
If you have a stereo speaker setup, your settings should look very similar to the panel above. These settings will differ slightly if you have a 5.1 setup, dedicated sound card or external audio interface.
PrPro will select your default sound output based on the default sound devices you have chosen in Windows / MacOS. Those devices selected in the default output should appear at the bottom of the audio hardware panel. There are 3 options you can change for these devices.

The speaker icons found on the left tell Premiere which speaker is left or right. This is obviously quite important but should be correct by default. If you would like to change it, simply drag and drop the speaker icon over the other one, it will swap the order around.
There are two other options you can change as well. The middle icon is for 5.1 surround speaker configurations to ensure each speaker is outputting the correct channel. You can ignore this if you do not have a 5.1 setup. The numbered icon found on the right refers to which channel each speaker outputs. When working with multichannel sequences, you may want to change the order, but these should stay as they are for most purposes. Check out our multichannel article for more information.
There are other premiere audio settings, but the default options will work just fine for most people. If you would like to have a look at them, go to Edit > Preferences > Audio.
Importing your clips and Audio Channel Mapping
To import your files, simply drag and drop them into the Project tab, or right-click on an empty area of the Project tab and hit Import to open an explorer window and find your files that way.
In any editing project, it is very important to stay organized, so make sure to have some kind of folder/bin system to sort your files, you can use the example below as a guide.
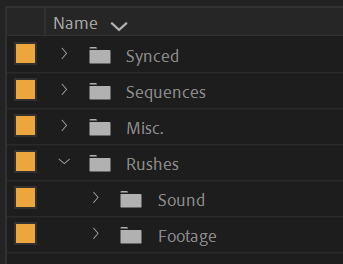
The following method applies to both video and sound files, as video files can carry multiple audio channels. If you would like to synchronize your video and sound files, you need to make sure your sound files are being interpreted properly by Premiere before syncing them. This process is outlined below.
Syncing video and sound will be covered briefly later in this article, but there are many different methods that can be used. We recommend reading this for more information about syncing, you may find a method that suits your project better: https://blog.frame.io/2018/05/14/premiere-batch-syncing/
When importing clips, it is important to prepare them properly to avoid issues later in the editing process. For example, you might have a single file from a recorder with 2 channels of audio on it, usually from different microphones. When you import that file, Premiere will interpret it as a stereo by default. This means it will be placed on a single track when you drop it in a sequence (see below). Both channels of audio will play back fine, but you will not be able to control each channel separately, which is essential for editing/mixing.

To separate those channels, you need to use Premiere’s audio channel mapping feature. This feature lets you interpret audio files to best fit your needs. For example, you can have a 2 channel stereo file be interpreted as 2 separate mono tracks which can be controlled independently. The following method also applies to any files with more than 2 tracks of audio.
In this case, I want to select all of my stereo files and interpret them as 2 mono tracks because they contain audio from 2 different microphones. Some of your files may contain only 1 channel of audio, meaning that they can be left as they are.
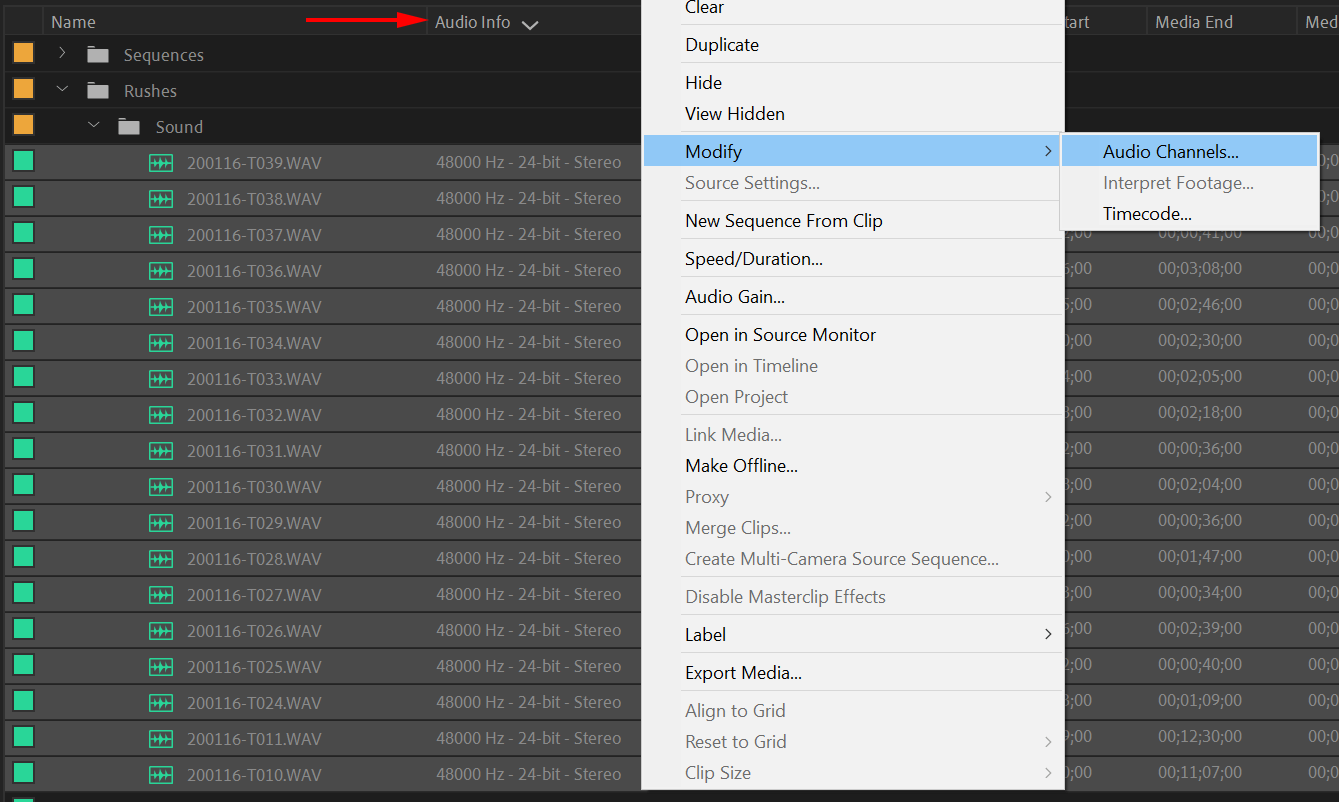
The easiest way to find which files need to be re-interpreted is to use the Audio Info column to sort your files by audio type. As you can see above, I have selected all of my 2 channel stereo files using this way. The same method can also be used to isolate files with more than 2 channels of audio. After selecting your clips, simply right-click, select Modify > Audio Channels, and it will bring up the channel mapping menu.
Your audio channel mapping menu should look like the left screenshot if you have a stereo file.
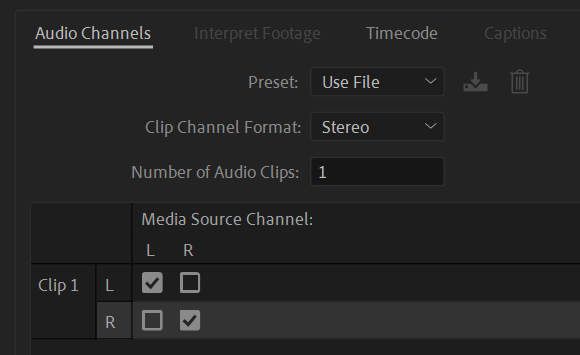
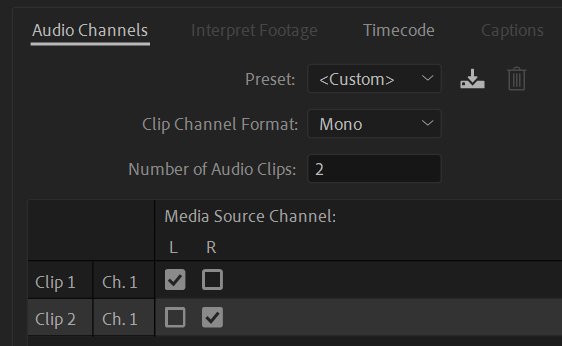
Use the Clip Channel Format drop-down menu, select Mono, then change the number of audio clips to 2, as the number of clips should match the number of channels in your file. Each channel should now have its own clip assigned to it. This will usually happen automatically, but a good visual cue is the diagonal pattern of checkboxes.
Below is an example of the mapping for a clip with 4 channels of audio, so the Number of Audio Clips is 4. As you can see, the diagonal pattern checkboxes are also present here.
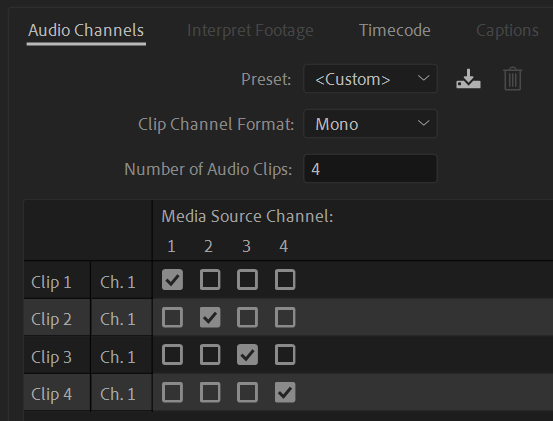
Once this is completed, click OK on the audio channel mapping menu. All your files should now be interpreted properly. You can see the change in the Audio Info column.

When you drop the same file into a sequence, it will now be placed on 2 tracks, as seen below.

Both clips will still be linked together by default, so if you would like to select them independently, simply click the uncheck the linked Selection button on the top left of your timeline panel, as seen below.

You can now edit each clip separately.
Syncing the sound
Once you have successfully remapped your audio files, you can move on to syncing them with the video. You only need to do this if your audio is coming from an external recorder, not if you were recording sound directly into the camera. As mentioned previously, the syncing process will be briefly outlined here, but it is recommended to read more information about it, as there are many different methods: https://blog.frame.io/2018/05/14/premiere-batch-syncing/
The syncing method we will use is to merge clips based on In points, as it is one of the more straightforward techniques. The basic idea is to find the same distinctive point in time on both the video and sound files. Such point is usually a clap using a clapperboard at the beginning of a take. If a clapperboard was not used or used incorrectly during the shoot, it can make it very difficult to synchronize the sound.
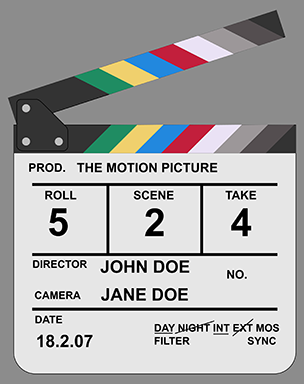
Most modern cameras will also be recording audio, usually of poor quality. This is referred to as the “scratch track”. This camera audio track makes it easier to find the same point on the audio from the external recorder. To begin, you need to find the video and sound files from the same take. The clapperboard will have identifying information (i.e. Scene, Slate and Take numbers) for each take written on it, so it can be seen on the video file, and the person clapping should call out that information, so that it can be heard on the sound file. This makes the process fairly simple.
However, if a clapperboard was not used, you will have to go through all your files to find the video and audio clips from the same take simply based on what you hear and see, which can be a painstaking process. If you do not have scratch audio and no clapperboard was used, it can be nearly impossible to sync everything depending on the number of files.
The best way to deal with a situation like this is to follow the camera and audio recorder file order and match the clips that way. This can be fairly effective, as long as you have around the same amount of video and audio files. If you have many more audio files than video files, that will make it difficult to find a match, because much of the audio needs to be discarded or used for other purposes (i.e. foley and sound effects).
Once you have identified an audio file matching a camera take, place them both in the same bin/folder. Double click on the video file to open it in your source monitor.
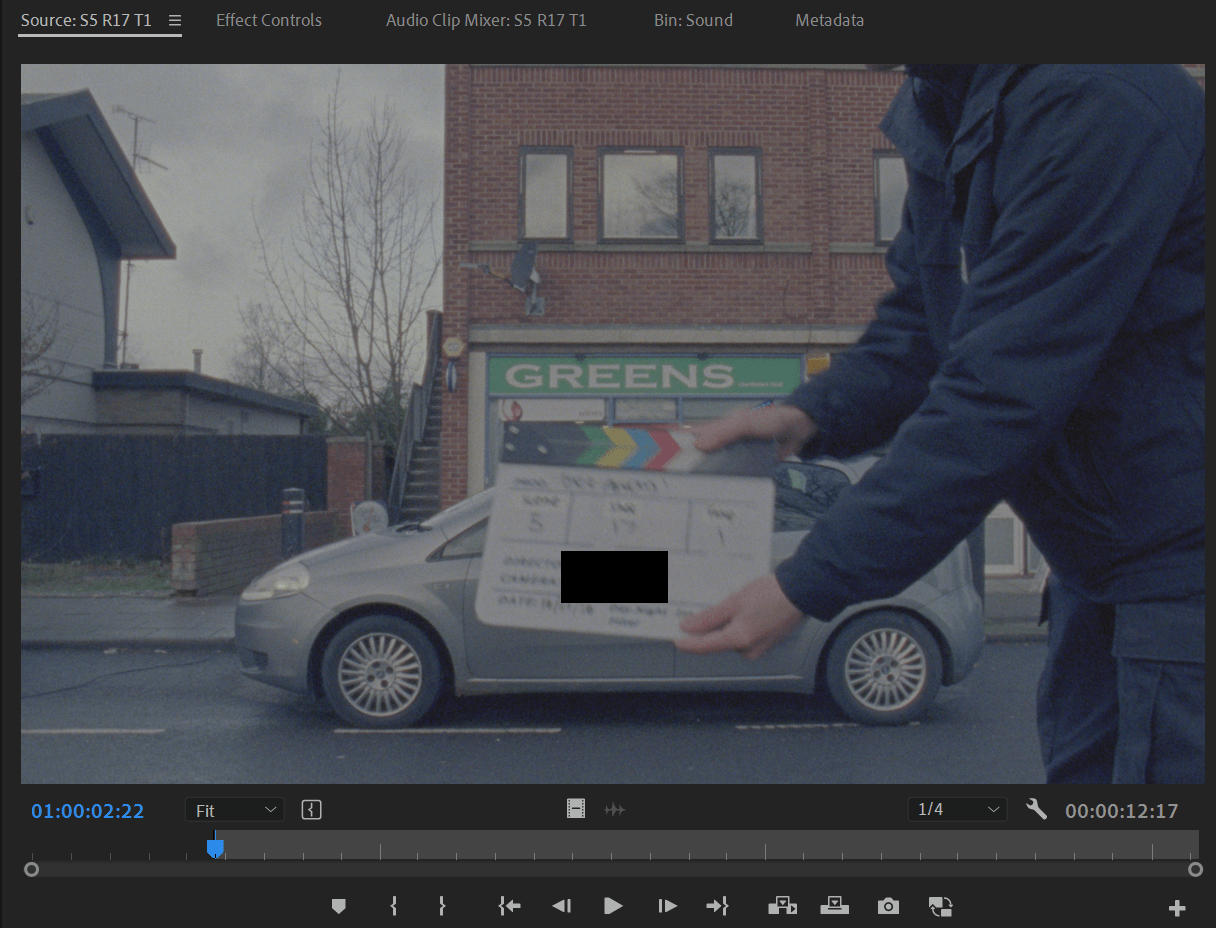
Play the file and find the point of the clap by going frame by frame. If you have a scratch track, listen out for the clap. If you do not, find the first frame where the upper clapper fully touches the lower one, as seen above. Once you find that point, press i and that will mark this point as In.
Then double click on the audio file and listen out for the clap. It can usually be identified by a peak in the audio waveform, which will look like a tall, straight line, as seen below. Once you have found that frame in the audio, press “I” to mark your "In Point".
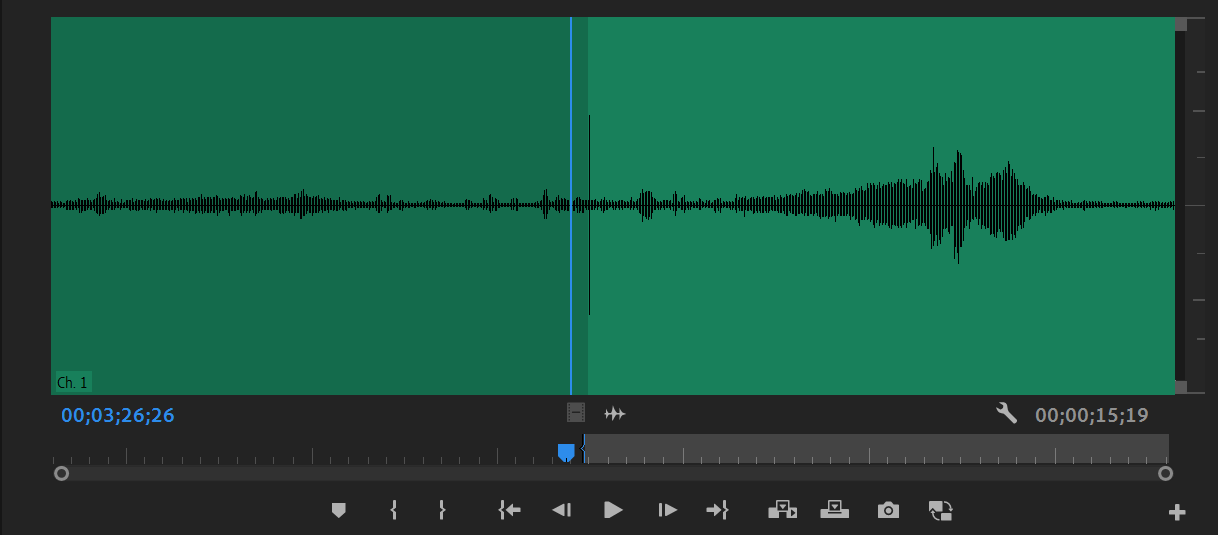
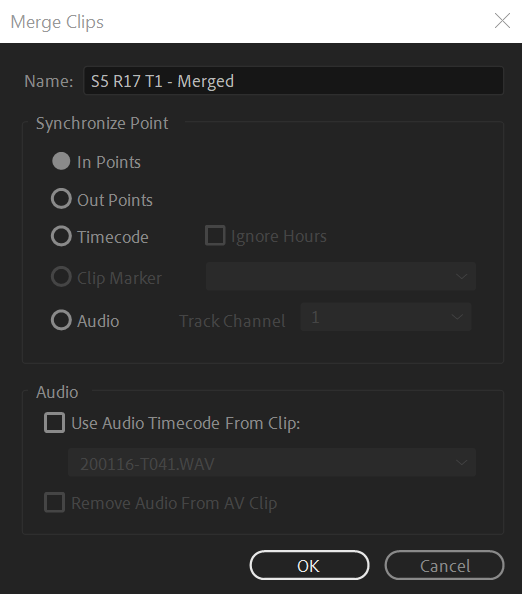
After both In points have been marked, select both files and right-click on them and choose Merge Clips.
This will bring up a menu where you can select In Points. If your camera has a scratch track, you can also select Remove Audio From AV Clip, to get rid of that audio, as the quality is often poor enough to make it unusable. Here you also have the opportunity to name your merged file. It is a good idea to give it a different name from the original file and place it in a separate bin to avoid confusion. Once you are happy with your settings, hit OK.
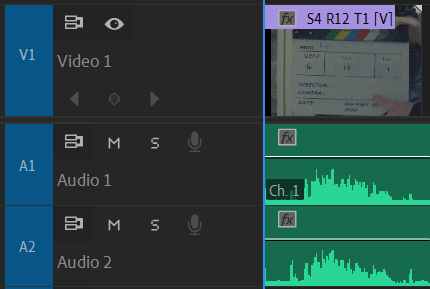
Now that the merged file was created, it includes the video and the audio tracks (multiple, if your sound file had more than one channel), and should look more or less like the image below when you place it in a sequence. As mentioned previously, they will still be linked by default, so uncheck the Linked Selection button on the top left of your timeline panel to be able to edit each clip independently. Since sound and video are now unlinked, be careful not to move the sound out of sync.
This process of marking the In points and merging the clips needs to be repeated for all matched video and sound files. Once you have merged all the files, you can organize them to your liking, and they will be ready to be edited. As time consuming as this process is, doing it properly will save you a lot of hassle and time during your editing. If you would like to learn more about audio in Premiere Pro, check out our audio import/export article.
If you have more Audio issues in Premiere Pro, contact us and tell us about it !


