Note : If you are not familiar with BRAW Studio yet, check our introduction article !
When does this issue happen ?
This issue only happens if you modified the Media Start timecode of your
footage, manually or also for example using our BRAW Studio Panel (see below).
For all we know, this Adobe CC behavior is not specific to Blackmagic RAW
(.BRAW) files.
Important Note : if you are using Premiere Pro 2020 and don't think you changed the timecodes of your footage (manually or with our Panel), it could be another issue. Please read our article about this : Premiere Pro Timeline Shifts (or First Frame) After Moving Project or Relinking Footage.
This issue happens when clips go offline and then are relinked. It can be the case when :
- You updated Premiere Pro and are opening projects saved from an older version of Premiere Pro
- When you move the location of your
.BRAWfootage - When your
.BRAWfiles are located on an external drive (or a network location) : their filepath could change from one session to another (on Windows, the letter of the drive can change)

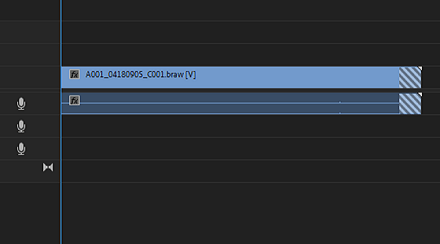
By a "shift", we mean that the in and out points of the clips on the timeline are moved by the same amount of time. Sometimes, the duration of the clip on the timeline is changed and you will see stripes on your clips. This is not strictly a bug, but a behavior chosen by Adobe, related to how to transfer timecode after a footage relocation.
Where does this issue come from ?
There's an Adobe bug related to NTSC timecode interpretation (framerate of
23.976 or 29.97). We created the BRAW Studio Panel in order to correct
such timecodes from your imported .BRAW clips.
When these clips are getting offline by Premiere Pro and need to be relinked (and this can be done automatically), if the option Align Timecode is set, then Premiere Pro will shift some clips in your timeline.
Note that some clips could be shifted, and others, not. It could also happen if
you modified the timecodes manually and it can happen to any other video files
with other formats than .BRAW.
How do I avoid this shift ?
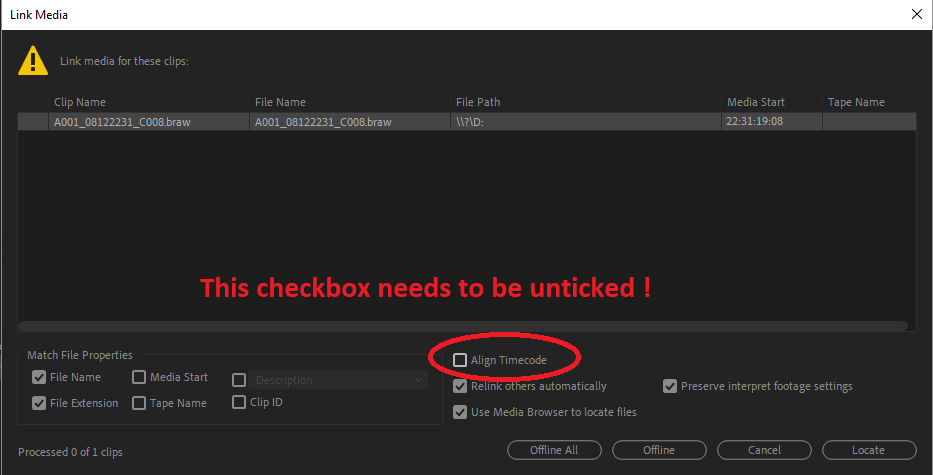
When PPro wants you to relocate the files, you need to untick the option Align Timecode and the shift should be avoided !
I want to avoid the shift, but the relink is done automatically : what should I do ?
- Open a new project
- Import one
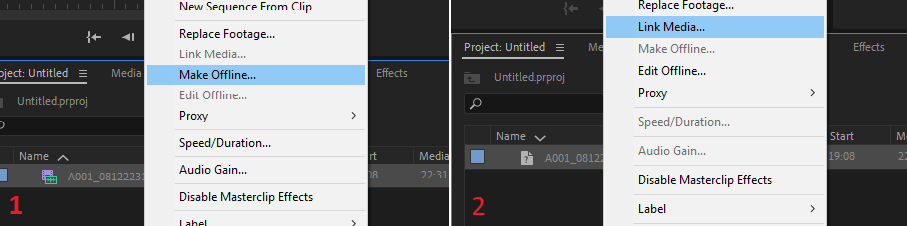
.BRAWfile inside - Right-click on the clip on the project panel and select Make Offline...
- Right-click again on the clip and this time select Link Media...
- In the Link panel, which will be displayed, untick the checkbox Align Timecode and then click Cancel.
Now, the option will be disabled every time you need to locate files (for new projects also), even if the Locate action is done automatically by Premiere Pro.
My project has been saved with the shifts and I can't go back in time... How do I repair it ?
Go to Window > Extensions > BRAW Studio Panel.
On the Toolbox tab of the panel, scroll down to the section named Timecode Shift.There, you will see 4 buttons to help you recover the original clips timecode on your timeline. If you don't see these buttons, please update BRAW Studio .
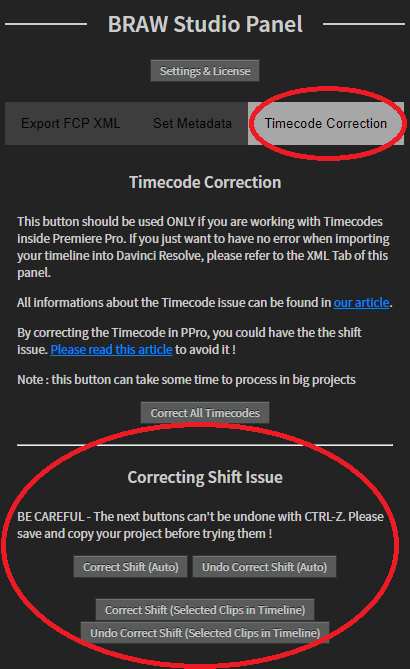
The first 2 buttons should repair all your clips, if all your files have gone offline then been relocated before. If the clips have gone offline and been relinked many times, your files could have suffered multiple shifts. In that case, you will need to click on the Correct Shift (Auto) button many times (for each click, check if the in and out points of the clip on the timelines are correct !). If you click one time more than needed by mistake, the second button, Undo Correct Shift (Auto), is here to undo the global shift of the first button.
The last two buttons are here to shift selected clips in your current timeline, in case the first 2 buttons are not sufficient.