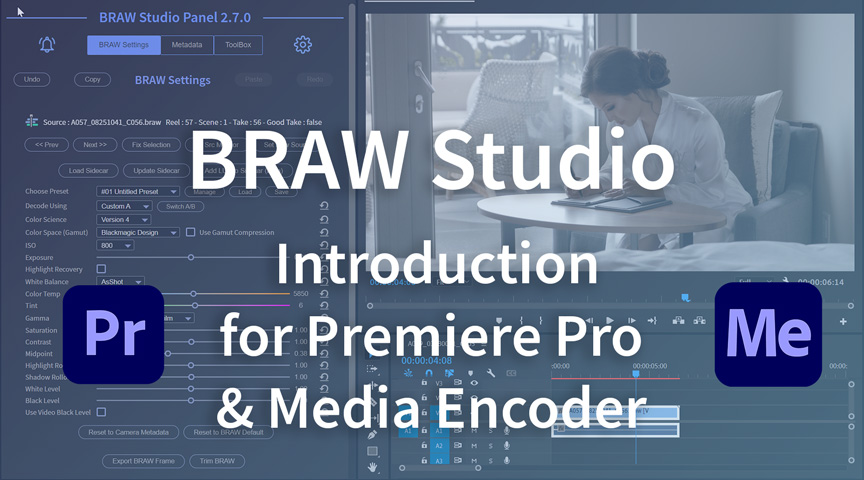
What is BRAW Studio ?
BRAW Studio is first (historically) a Premiere Pro / Media Encoder / After
Effects plugin which uses the official Blackmagic RAW API made by Blackmagic
Design to import, decode and process your .braw files. It means
that your imported footage will have the same look and visual quality than in
the official Blackmagic tools (DaVinci Resolve and BRAW Player), using the
Blackmagic's Color Science.
BRAW Studio is also a Desktop Application to play your BRAW file, change its RAW Settings, add a custom LUT, and more outside of any editing software (NLE) ! More information in this article.
We always update our application and plugins as quickly as possible when a new version of the BRAW API is available (see our Changelog), which is usually when a new firmware for your camera or a new version of DaVinci Resolve is released.
In order to Install or Update BRAW Studio for free ,
just download the installer following this link, unzip
it and execute the .exe (Windows) or .pkg (macOS).
Licensing : FREE vs. Premium Version
With the FREE version, you have access to the basic features of a BRAW Importer in Adobe plugins, and you are able to tweak the BRAW Parameters from the BRAW Source Settings effect in Premiere Pro. To put it simply, you will find for FREE all the features available in the Blackmagic Design PrPro Plugin, without all its bugs, as well as official support for After Effects. In the Desktop Application, you will be able to play your BRAW files, and preview them with different RAW Settings.
With the Premium version, you'll unlock powerful features such as : the BRAW Studio Presets, Custom A/B, quick comparisons, the White Balance Picker, add Custom LUT, and in Adobe plugins : the BRAW Studio Panel, Batch Apply changes to many .BRAW at once, and A LOT more.
More details about the difference between the FREE and Premium version in this article.
The BRAW Studio Panel for Premiere Pro
The BRAW Studio Panel can be found in the Premiere Pro top menu, under "Window" -> "Extensions" -> "BRAW Studio Panel".
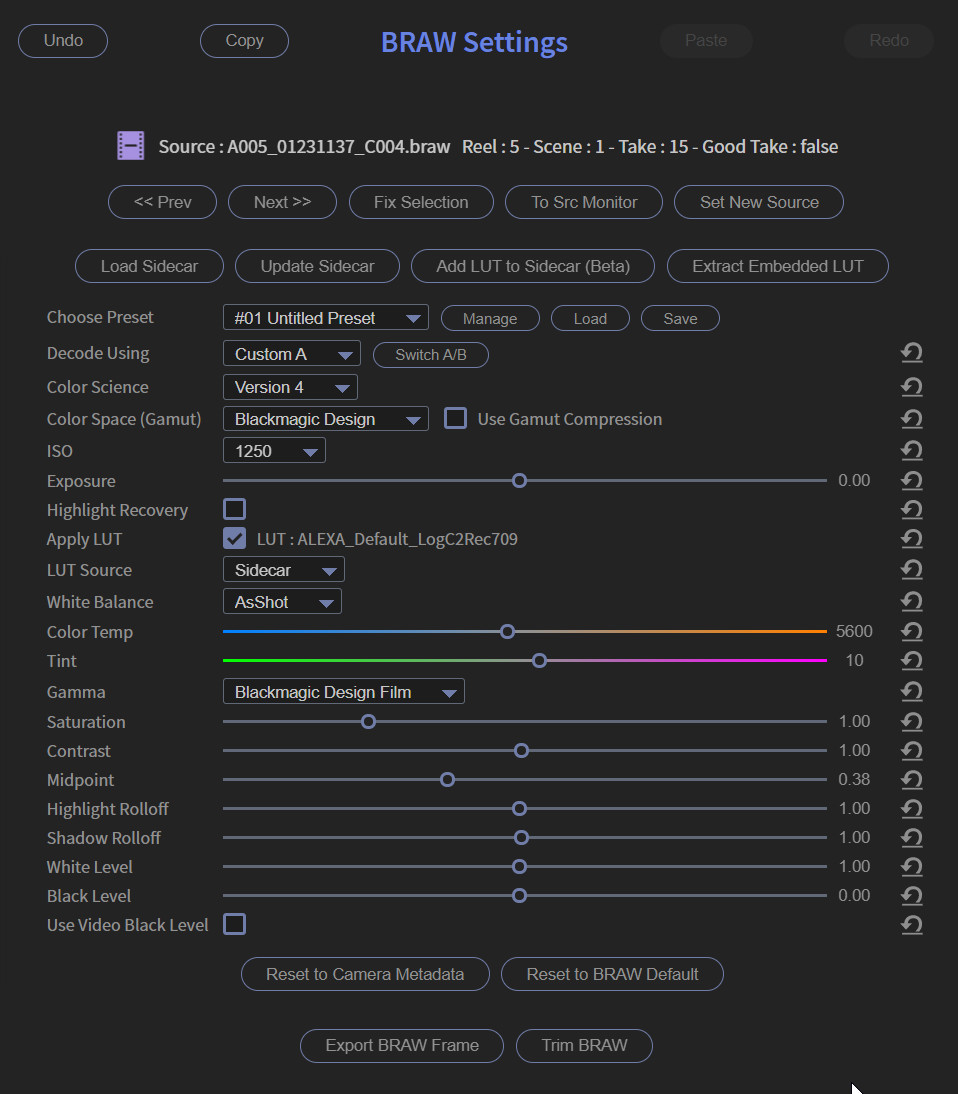
Source Settings in the Panel
You can directly grade your footage (and so access the BRAW Source Settings) from this Panel. There are also some feature to improve your workflow when working with BRAW files in Premiere Pro. Check our article about these Source Settings in Panel.
BRAW Metadata
There is metadata saved in the BRAW File, such as the camera name, the lens name, the compression ratio, the "Reel/Scene/Take" numbers, ... You can only access them with BRAW Studio in Premiere Pro, but also organize your project from them ! Please read our dedicated article about the BRAW Metadata for more information.
The BRAW Studio Settings
BRAW Studio Settings are mainly the official RAW parameters you can set to
change the way your .braw files are decoded, with additional
Settings we added to help user's workflow (such as Presets, A/B Comparison,
White Balance Picker, ..). In order to create a seamless experience with BRAW
Studio, we took inspiration from the same UI in DaVinci Resolve to design our
GUI. Any Resolve user should easily find the same parameters without confusion.
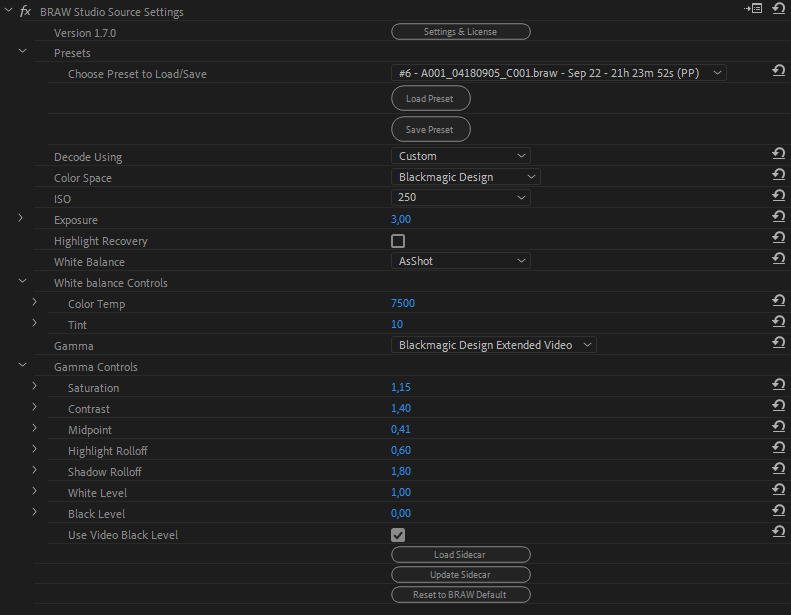
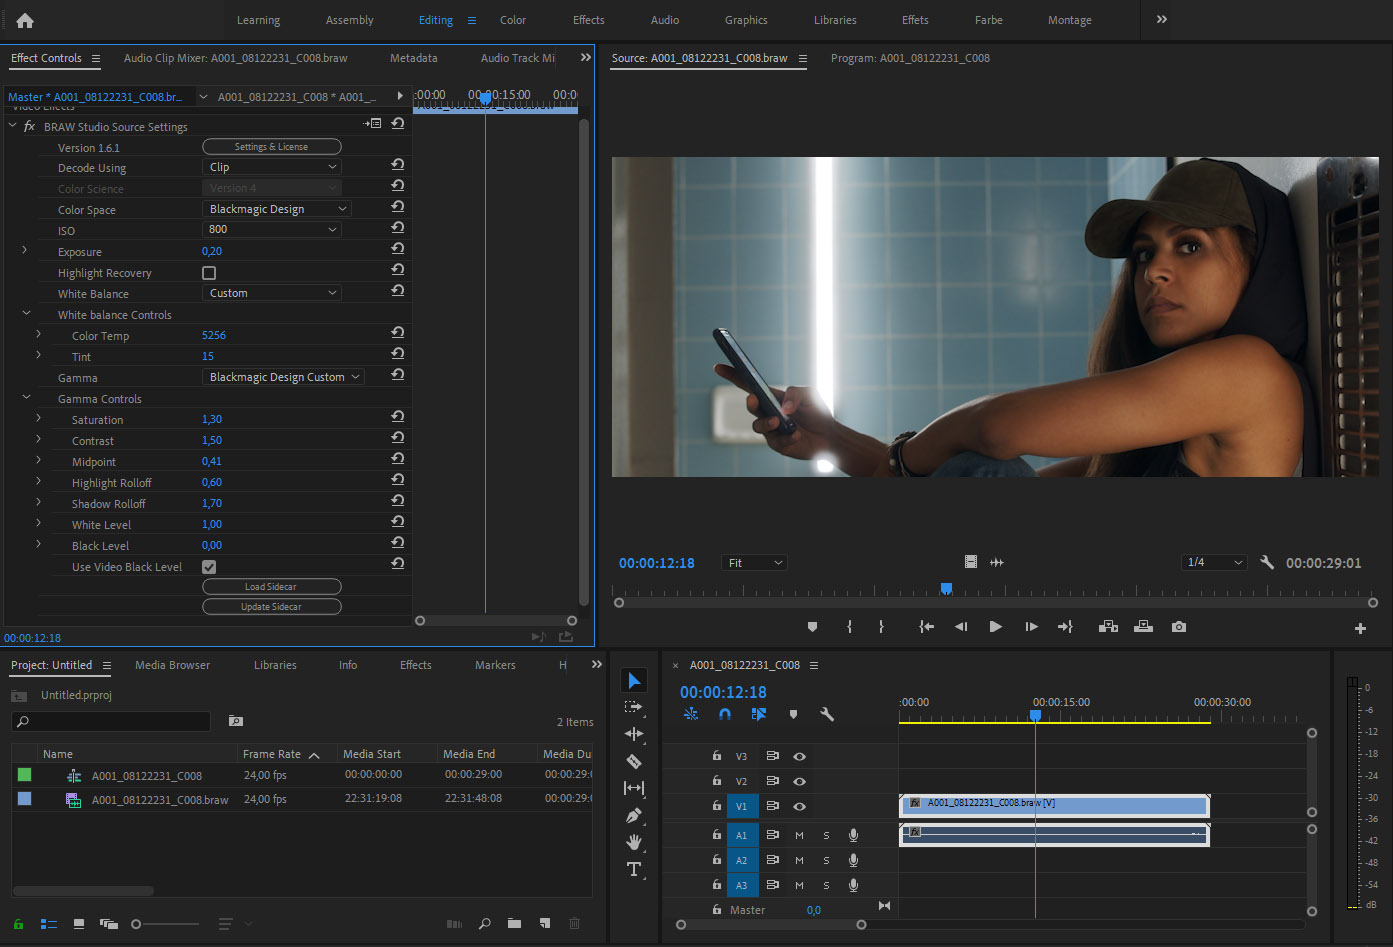
BRAW Studio Settings in Adobe Plugins : the Source and Layer Settings
The two different effects (Source Settings or Layer Settings) correspond to the same parameters but applied to a different element in different applications.
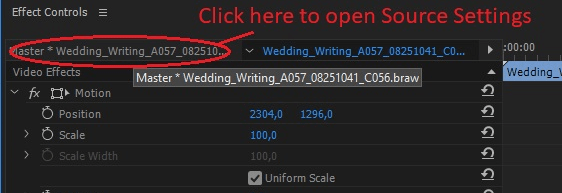
The Source Settings are applied to the Source in Premiere Pro, so if you cut a clip in two parts, changing the parameters in the Source Settings will change the aspect of both parts of the clip at the same time because they have the same "Source". You can change the BRAW Settings from the Source Settings effect but it is easier to do it directly from the BRAW Studio Panel which acts like the Lumetri Panel ! Otherwise, the Source Settings effect can be accessed from the "Effect Controls" Panel : You can double-click on your clip in the project panel or if you have already added your clip to a timeline, you can select the clip in the timeline, then in the "Effect Controls" Panel, click on the "Source" tab.
The Layer Settings are applied to the Layer in After Effects, so if you are using multiple times the same Source, each layer will change its own part. In After Effects, the Layer Settings is an effect to apply to a braw layer to be able to tweak its parameters. It is easier to use than the "Source Settings" (see below) and also gives better performances ! See our AE dedicated article.
You can access Source Settings in After Effects and Media Encoder. It is going to open our Desktop Application, where you can edit BRAW Settings and when clicking "OK", those changes will be applied to the BRAW item. In order to access those Source Settings :
- In After Effects : right click on your BRAW "Source Layer" (in the Project Panel) -> "Interpret Footage" -> "Main..." and then click on the button "More Options" at the bottom.
- In Media Encoder : right click on the BRAW file inside the queue -> "Source Settings"
When no settings has been applied (Source or Layer Settings),the default settings are applied, which corresponds to the "Decode Using : Camera Metadata" (see below).
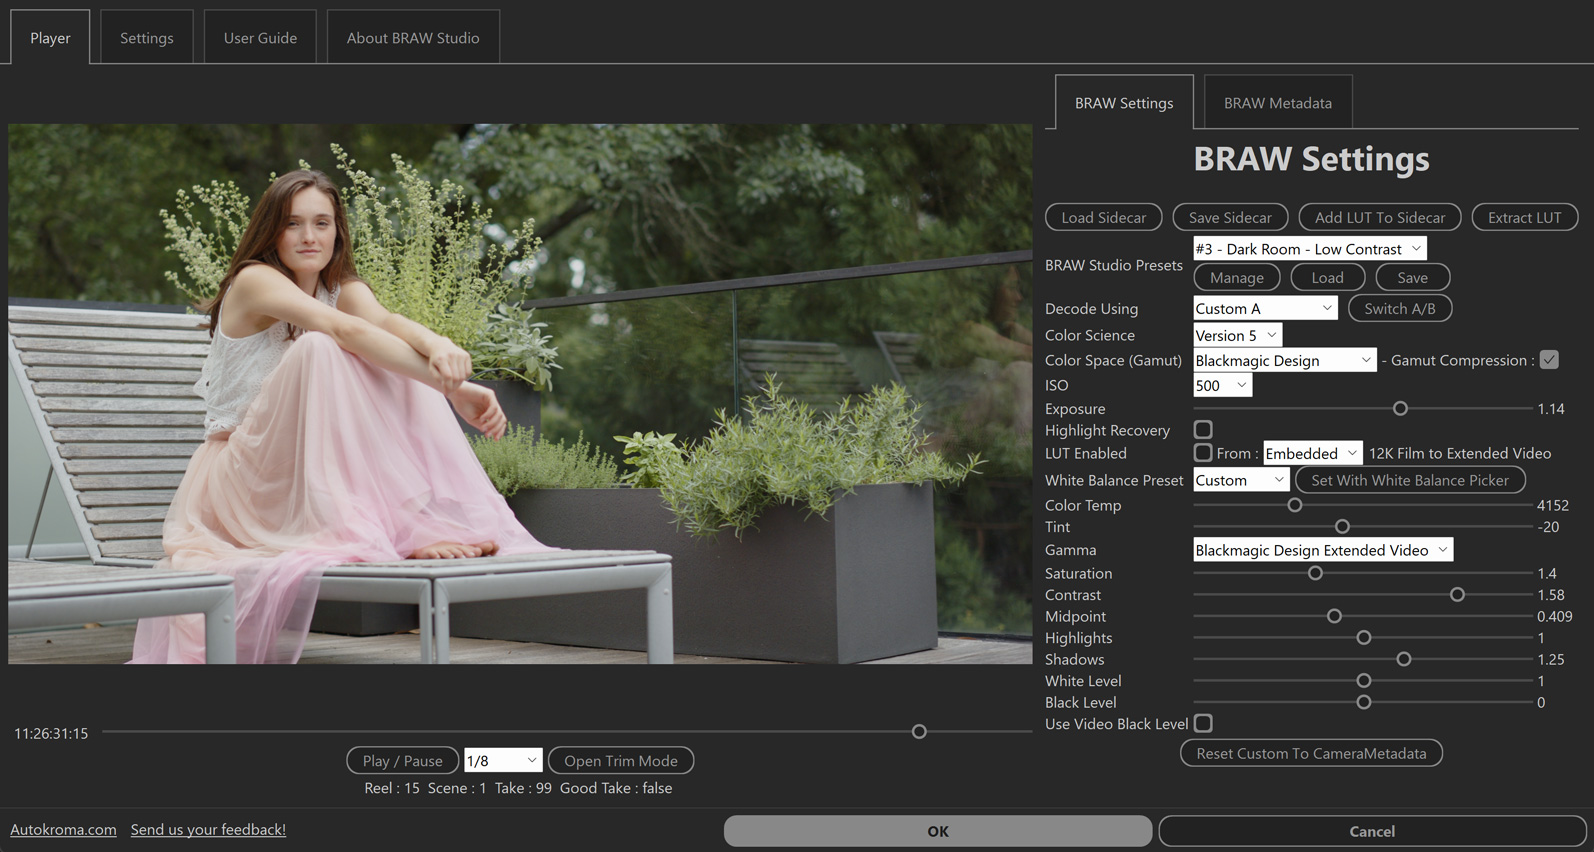
BRAW Studio Settings in the Desktop Application
You can play and change BRAW Settings in our Desktop Application.
You can open it from any BRAW file as it should be set as the default app (if not : select "Open With .."). Otherwise, You will find it here :
- Windows : C:\Program Files\Adobe\Common\Plug-ins\7.0\MediaCore\BRAW Studio
- Mac : /Library/Application Support/Adobe/Common/Plug-ins/7.0/MediaCore/Autokroma BRAW Studio
If you want to save them, you will need to do it through the sidecar with the "Update Sidecar" button ! If BRAW Settings are saved into the sidecar, they will be automatically loaded by default in any application which import this BRAW file if "Decode Using" is set to "Camera Metadata" (which is the default value !).
From this application, you will also be able to set general options for BRAW Studio, and register your license(s). For example if you get a crash before being able to access the Settings of a clip, we will need some logs to help you, and it is only possible to activate logs from here ! (See our article about reporting a bug !)
Setting : BRAW Studio Presets
The BRAW Studio Presets are a way to quickly apply a set of params you like. Those presets are shared across all different applications !
The official Premiere Pro Presets functionality doesn't work well with BRAW Studio, and we strongly advise you to not use it ! You should use the "BRAW Studio Presets" feature directly in the Source Settings : you can load and save your RAW settings in up to 20 different presets, fast and easy!
More information in our dedicated article !

Setting : Decode Using
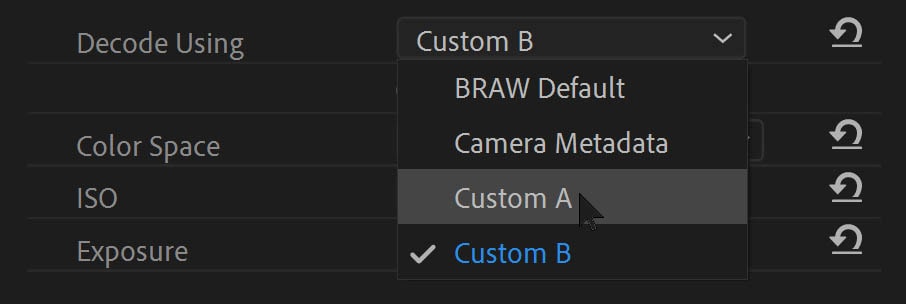
The "Decode Using" setting indicates how your file is decoded. There are 3 available values :
- Decode Using - Camera Metadata : The default value. It corresponds to the settings used in the camera when the braw file has been shot. If a sidecar file is present for this braw, its values will be set here. (see below section : "What about the sidecar file ?")
- Decode Using - BRAW Default : This corresponds to the fixed default settings for every parameter. These default values have been taken from the BRAW API documentation. Note that : Color Science, Gamut, ISO, Gamma and LUT don't have fixed default settings, so the one used here are the ones from "Camera Metadata".
- Decode Using - Custom (A or B) : This corresponds to the custom settings you would want to set for your braw file. All the other parameters can be changed only in this mode ! When you import a file and switch "Decode Using" from "Camera Metadata" to "Custom", you should not see any difference in the the render, because all parameters of the "Decode Using : Custom (A and B)" are initialized with the values from the "Decode Using : Camera Metadata".
Setting : Custom A and Custom B
From BRAW Studio 1.7.4, we implemented two "Decode Using : Custom" : A and B. It means there are two internals set of RAW Params you can change and access :
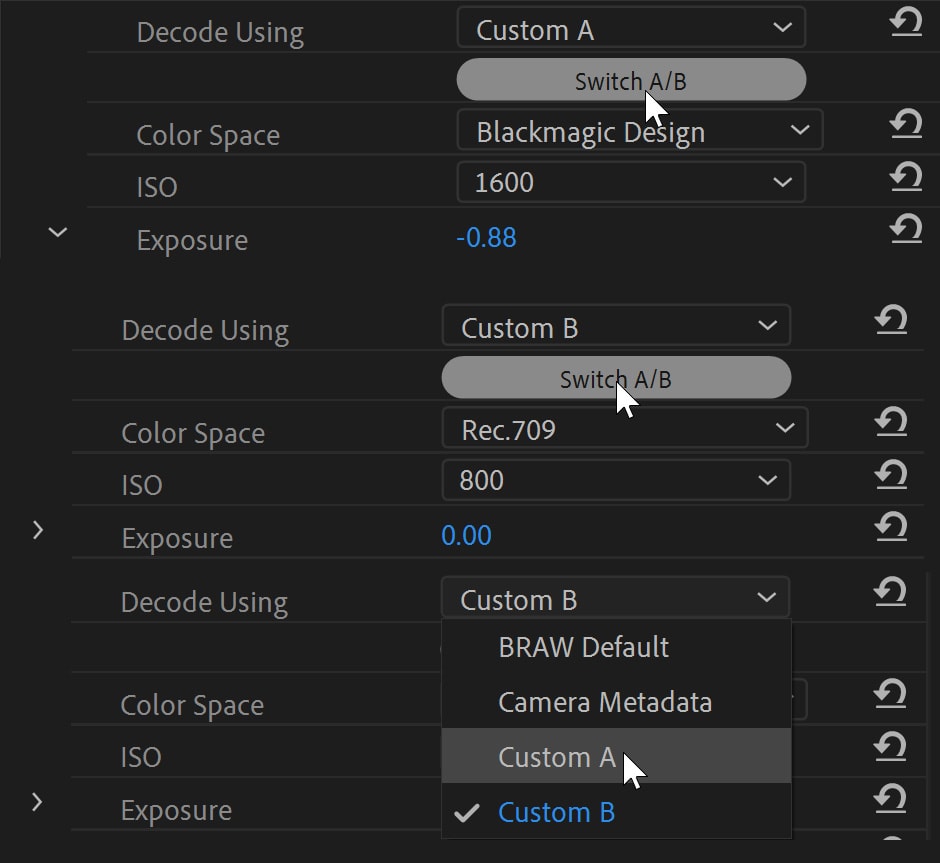
Thanks to this new feature, you can quickly compare two different color grades by clicking on the "Switch A/B" button (the image preview on the right will update) :
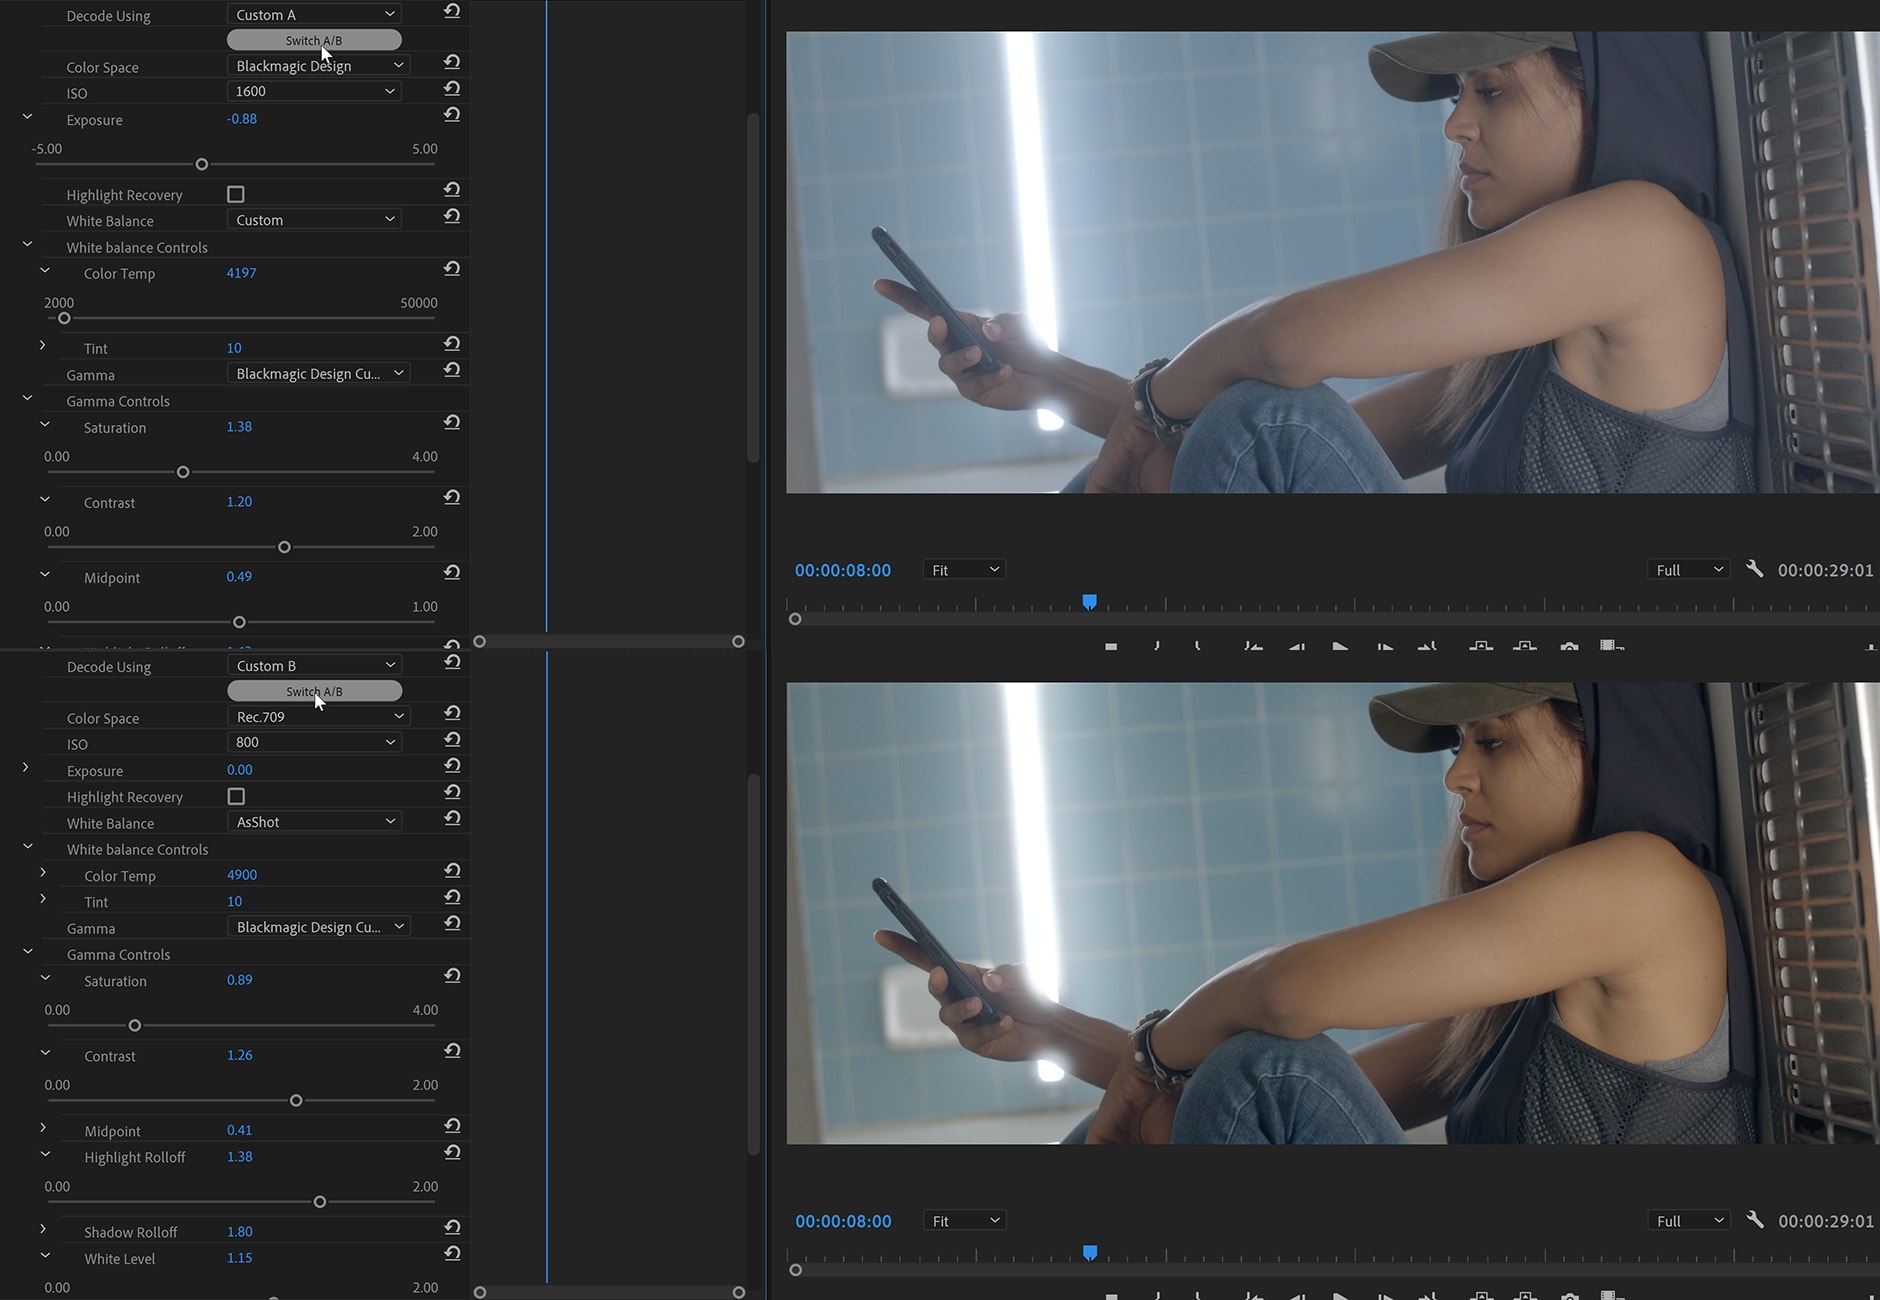
Note that loading a preset or the clip sidecar will load the values inside the current Custom (or in CustomA, if DecodeUsing : Camera Metadata or BRAW Default is selected).
Setting : Color Science
You can choose between Color Science V4 and Color Science V5 !
Setting : ISO
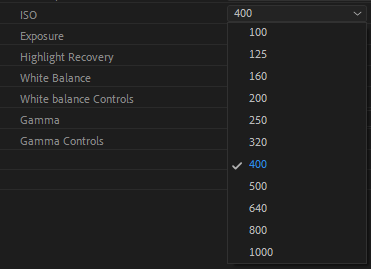
The available ISO List depends on the camera used to shoot the braw. Some cameras (like the BMPCC 4K for example) have a DUAL ISO system : if you shoot between ISO 100 and ISO 1000, you will be able to change the ISO in BRAW Studio only between this range (100-1000), and same for the range between 1250 and 25600. For more information about the DUAL ISO system, you can follow this article : https://fstoppers.com/education/what-dual-iso-and-why-lowest-iso-not-always-best-option-343087
Setting : LUT
In some Blackmagic Cameras, it is possible to set a LUT in the camera itself. If BRAW Studio detects a LUT in the braw or in the sidecar file attached, there will be an option available to apply it in BRAW Studio, and select the LUT Source ("Embedded" for the LUT in Camera or "Sidecar" for the LUT in the sidecar file).
With BRAW Studio, you can also set a Custom LUT to the BRAW Settings through the sidecar ! Check this article for more info.

Setting : White Balance
White Balance is composed of 2 Settings : Color Temperature and Tint. With those settings you can balance your BRAW colors between blue and orange (Color Temperature), or green and pink (Tint).
The White Balance dropdown above both sliders is here to quickly test different "presets" from contexts such as "Daylight" or "Cloudy".
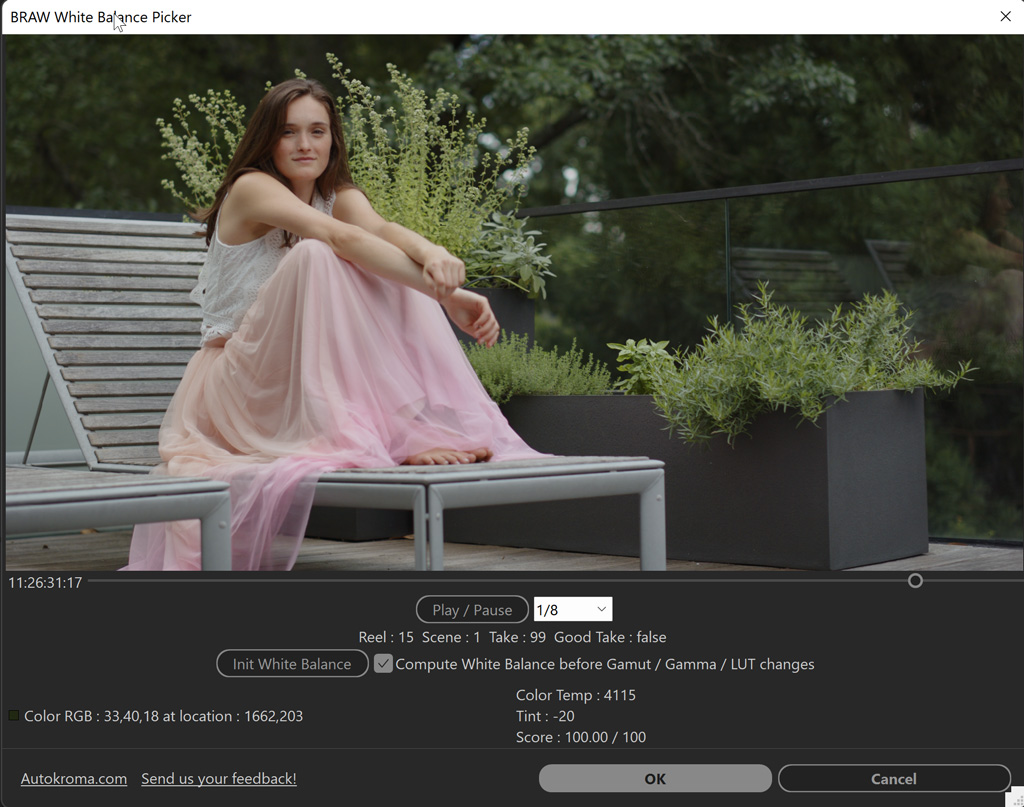
If you want to start your Color Correction with precise neutral colors, the White Balance Picker is here to help ! With this tool, click on a white/grey part of the image to set automatically white balance accordingly. More info in this article.
Setting : Update and Load Sidecar buttons
- Update sidecar will put the settings from "Decode Using : Custom" into the sidecar next to the braw file.
- Load sidecar will set the settings in "Decode Using : Custom" from the sidecar next to the braw file (if present).
A blue popup should be displayed at the bottom right of Premiere Pro, indicating if the sidecar has been updated/loaded or not found.
Note : For now, the LUT feature is not saved or loaded by these buttons into the sidecar.
How to copy Source Settings from one clip to another
In Premiere Pro effects, there are 2 ways of applying existing effect parameters to another. The "Copy/Paste" feature and the "Preset" feature.
The save/apply preset feature of Premiere Pro should not be used with BRAW Studio, as it could result in undesired effects.
With the BRAW Studio Panel, just select a clip and hit the "Copy" button, select your other clip (or multiple ones !) and hit the "Paste" button (Note : also works with shortcuts !)
To apply the parameters from one clip to another without the BRAW Studio panel :
- Go to its Source Settings
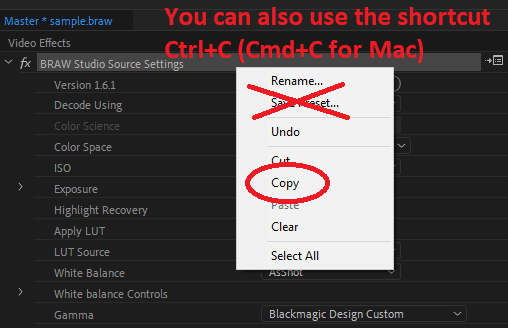
- Select the effect and use the shortcut "Ctrl + C" (Cmd + C on Mac) to copy (you can also right-click on the Effect name and select "copy")
- Then in the project panel you can select one OR many clips and use the shortcut "Ctrl + V" (Cmd + V on Mac) to apply the BRAW Parameters to these clips !
Note : The clip you are pasting the source settings to might have a different ISO list available ! If the ISO setting you copied from the first clip is not available in the clip you are pasting it to, there will be blue popup which will appear at the bottom right of Premiere Pro, saying that the ISO has been set to the lowest value possible under the original ISO value.
Sidecar file Workflow
The Sidecar file is a JSON file with the .sidecar extension, which
is associated with a .braw file if it has the same name and is
located in the same folder. It is Blackmagic's official reversible way to change
the way .braw files are decoded without modifying the
original .braw file. The content of the Sidecar changes
the behavior of "Camera Metadata". If no Sidecar is present, "Camera Metadata"
will take its RAW params values from what's stored inside the .braw
footage.
If a sidecar is present next to the BRAW file when imported into Premiere Pro with BRAW Studio, or when an existing project is loaded, its values will be used in the "Decode Using : Camera Metadata" mode. But it change it if the Sidecar file is created, moved or deleted during the Premiere Pro session and after the braw file import.
In the "Decode Using : Custom" mode, you will be able to export (Save) the current settings in the Sidecar, or import (Load) the settings of the Sidecar inside the Source Settings.
The sidecar can be used in some workflows, mainly to export the RAW params and use them in another software. For example, if you grade inside Premiere Pro with BRAW Studio, and export your timeline as a FCP XML to import it in Resolve, you will not have the values of the BRAW parameters inside the XML meaning they will be not present in Resolve after importing the XML. A workaround is to export the Sidecar and you will keep your BRAW Settings !
We also introduce a feature for writing a Custom LUT in the sidecar, so the LUT is then processed through the BRAW decoding, like an Embedded LUT. You can find a button in the BRAW Studio Panel to test this and add your Custom LUT to the sidecar.
Does BRAW Studio use the GPU ?
The Premiere Pro SDK for importers like BRAW Studio doesn't allow us to code a full GPU Importer sadly.
However there is a hybrid CPU-CUDA solution available for Premiere Pro on Windows that you can enable in the Settings tab, only if you have a recent nVidia graphics card.
In After Effects, from BRAW Studio 2.1.0 you can now use the full GPU mode with the Layer Settings ! See our AE dedicated article.
The Desktop Application does not use the GPU as well for now, CPU only seems to give good performance though. It is something we could improve in the future ! Contact us if you experience bad performances with it !
Please send us your feedback about any performance difference you experience when using this setting !
We hope you will like BRAW Studio ! If you have any feature request, contact us !
